

LLMs continue to evolve, but we struggle to feed context to them. We realized that fine-tuning was not always the right solution for providing context to an LLM, and new approaches like RAG started to emerge. Then Anthropic introduced the Model Context Protocol (MCP). Ever since MCP arrived, developers have been building many MCP servers to connect LLMs with external tools, data, and custom logic.
If you are new to MCP, here is what you need to know, at its core, MCP is a protocol that connects LLMs with external data sources and tools, extending their capabilities beyond their training data.
In my previous blog post - "How to Build Your Own MCP Servers," - we discussed how to build an MCP server from scratch.
I've also written a few other posts that might be helpful if you're exploring the field of AI. Feel free to check them out.
In this post, we will explore how to host your MCP Server. Before diving into hosting options, it is essential to understand the two primary transport mechanisms used in the Model Context Protocol.
Here's what we are going to cover:
MCP Transport Mechanisms
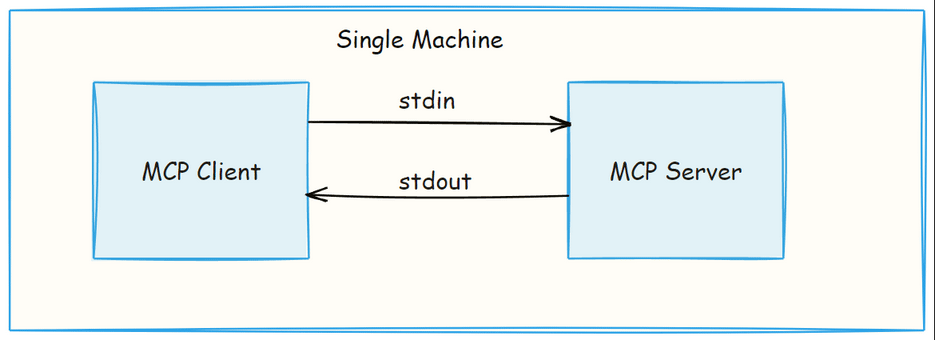
Standard Input/Output (stdio)
Server-Sent Events (SSE)
Hosting Options
Local Hosting (uses stdio )
Remote/Cloud Hosting (uses
SSE)
MCP Transport Mechanisms
The Model Context Protocol has two transport mechanisms that define how the client and server communicate. Since the two methods serve different needs, local hosting and remote hosting use separate transport mechanisms.
1. Standard Input/Output (stdio)
This is the transport method when both MCP client and server run on the same machine, during development or local testing. It uses the program’s standard input and output streams to exchange messages between client and server.
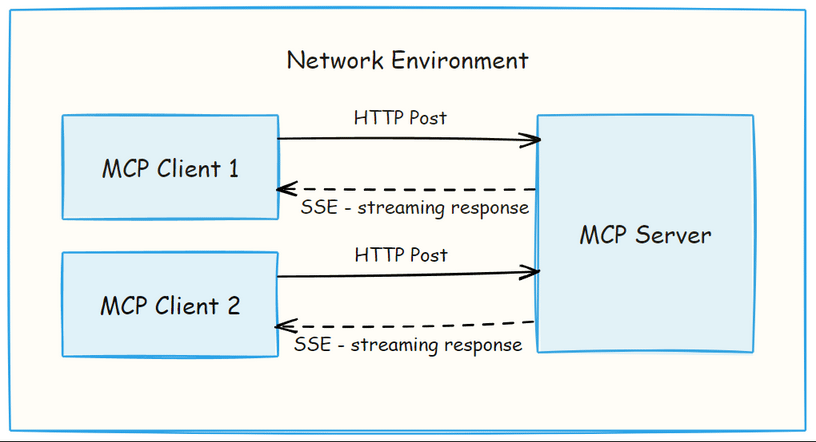
2. Server-Sent Events (SSE)
SSE is used when the server and client are running on different machines or across a network. It uses
client → server - HTTP POST
server → client - SSE
This transport method is useful when the server is hosted remotely and needs to support multiple clients at the same time.
Why SSE instead of WebSockets?
You might wonder why MCP uses Server-Sent Events instead of WebSockets, which are commonly used for real-time communication. The answer lies in MCP's priorities,
Simplicity: SSE is simpler to implement and manage than WebSockets.
HTTP Compatibility: SSE works over standard HTTP, while WebSockets require a protocol upgrade.
Cloud Support: SSE is simple at the same time it has support in cloud environments and serverless platforms.
Use Case Fit: MCP mostly needs server-to-client updates which is what SSE is designed for.
Before we move on, if you are planning to use SSE in your MCP server, there are few security practices you should be aware of.
SSE Security: What You Should Know
Check the Origin header of incoming requests to make sure they are coming from trusted clients.
Use simple auth to protect your endpoints, especially if your server is exposed to the internet.
While testing SSE server in local, bind your server to
127.0.0.1. Binding to0.0.0.0can expose it to outside networks.
That said, SSE comes with its own limitations, when used in production environments. We will read about those challenges and how some teams have worked around those challenges later in the blog. Definitely worth reading if you're planning to use SSE in a production.
Let us now explore different way of hosting MCP Servers.
1. Local Hosting
Local Hosting is running your MCP server on the same machine as the client, using the stdio transport.
Here’s a quick look at the components involved in this local setup,
MCP Server → The Web Content Extractor
MCP Client → Claude Desktop
Hosting Platform → Local Machine
Here is the server.py in python.
## server.py

from mcp.server.fastmcp import FastMCP
import requests
from bs4 import BeautifulSoup

mcp = FastMCP("WebExtractor")

@mcp.tool()
def extract_content(url: str) -> str:
    try:
        response = requests.get(url)
        soup = BeautifulSoup(response.text, 'html.parser')
        # Get text
        text = soup.get_text()
        return text

    except Exception as e:
        return f"Error: {str(e)}"

if __name__ == "__main__":
    mcp.run()
In MCP, any function declared under
@mcp.toolis treated as a tool. If you want to add more tools, just define each one as a separate function and decorate it with@mcp.tool.
In general, you can run the Python MCP server manually like this.
python server.py
# or
mcp run server.py
Connecting Local MCP Server with MCP Client:
In local hosting, you don’t need to run the server manually. MCP Client - Claude Desktop handles it for you, it launches the server as the sub process, right on your machine. It supports JavaScript-based servers using npx and Python-based ones using uvx.
If the server code is on your machine, you can connect it to Claude Desktop by running below command.
mcp install server.pyNote: After
"mcp install server.py", always double-check the auto-generated entries inclaude_desktop_config.json, as they may be incorrect at sometimes.
Alternatively, you can skip "mcp install server.py" and add the entries of claude_desktop_config.json manually like below. Ensure to restart Claude Desktop after config changes.
"WebExtractor": {
      "command": "uv",
      "args": [
        "--directory",
        "/path/to/your/server/directory",
        "run",
        "server.py"
      ]
    }
How stdio Transport Works in Local Hosting
In this setup, the MCP server uses stdio transport, which means communication happens through program’s standard input (stdin) and standard output (stdout). When Claude Desktop connects to your MCP server, it launches the server script as a subprocess.
From there, the client and server exchange messages directly through these input/output streams. No HTTP requests, no network ports, and no SSE involved. It’s a simple, lightweight way to run everything locally.
MCP server as a python package:
Now, let us publish our above MCP server (Web Content Extractor -server.py) to PyPI. The idea here is to turn it to a prebuilt server, so others can easily install and run it locally.
To share our MCP server as a PyPI package, we need to structure it as a proper Python package:
Start by creating the required directory structure.

Next, add an __init__.py file to your package. This helps Python treat your folder as a module.
# src/web_extractor/__init__.py
from .server import extract_content, mcp
Then, define your package metadata in pyproject.toml. It includes the package name, version, description, and other details needed for packaging and publishing.
# pyproject.toml

[build-system]
requires = ["setuptools>=61.0", "wheel"]
build-backend = "setuptools.build_meta"

[project]
name = "mcp-web-extractor"
version = "0.1.1"
description = "MCP server that extracts content from web pages for LLMs"
readme = "README.md"
authors = [
    {name = "your_name", email = "your_email_id"}
]
license = {text = "MIT"}
classifiers = [
    "Programming Language :: Python :: 3",
    "License :: OSI Approved :: MIT License",
    "Operating System :: OS Independent",
]
dependencies = [
    "mcp>=1.2.0",
    "requests",
    "beautifulsoup4",
]
requires-python = ">=3.9"

[project.scripts]
mcp-web-extractor = "web_extractor.server:main"

[tool.setuptools]
package-dir = {"" = "src"}
Once the structure is ready, build your package. This will generate distribution files inside the dist/ folder.
pip install build
python -m build
To share your server with the public, publish to PyPI.
# Install twine if you don't have it
pip install twine

# Upload the package (you'll need a PyPI account and token)
twine upload dist/*
When you run the upload command, it will prompt you for authentication. Make sure you have created a PyPI account and generated an API token from your account settings.
After publishing, anyone can use your server just by adding package name to their Claude Desktop configuration like this. In our case, the package name is mcp-web-extractor (as specified in pyproject.toml).
{
  "mcpServers": {
    "web_content_extractor": {
      "command": "uvx",
      "args": [
        "mcp-web-extractor"
      ]
    }
  }
}
MCP server as a npm package:
Python not your thing? If you’re more into TypeScript, you can build the same Web Content Extractor MCP server in TypeScript and publish it as a npm package, just like we published as a pypi package.
Below is my project structure:

The web-extractor.ts file contains the core logic to extract content from a web page using cheerio.
// web-extractor.ts

import * as cheerio from 'cheerio';

export async function extractWebContent(url: string): Promise<string> {
  try {
    if (!url.match(/^(https?:\/\/)/i)) {
      throw new Error('Invalid URL');
    }

    const response = await fetch(url);

    if (!response.ok) {
      throw new Error('Failed to fetch content');
    }

    const html = await response.text();
    const $ = cheerio.load(html);
    const title = $('title').text().trim();

    $('script, style, nav, header, footer, iframe, noscript').remove();

    let mainContent = $('main, article, [role="main"], .content, #content');
    if (mainContent.length === 0) {
      mainContent = $('body');
    }

    const text = mainContent.text();

    return `Title: ${title}\n\n${text}`;
  } catch (error) {
    throw new Error('Failed to extract');
  }
}
This index.ts is your MCP server entry point. It registers the tool and uses StdioServerTransport to allow any MCP client to connect.
//index.ts

#!/usr/bin/env node

import { McpServer } from "@modelcontextprotocol/sdk/server/mcp.js";
import { StdioServerTransport } from "@modelcontextprotocol/sdk/server/stdio.js";
import { z } from "zod";
import { extractWebContent } from './web-extractor.js';

// Create MCP server
const server = new McpServer({
  name: "WebExtractor",
  version: "0.1.0"
});

// Register the extract_content tool
server.tool(
  "extract_content",
  {
    url: z.string().url("Must provide a valid URL")
  },
  async ({ url }) => {
    try {
      const content = await extractWebContent(url);
      return {
        content: [{ type: "text", text: content }]
      };
    } catch (error) {
      const errorMessage = error instanceof Error ? error.message : String(error);
      return {
        content: [{ type: "text", text: `Error extracting content: ${errorMessage}` }],
        isError: true
      };
    }
  }
);

// Start the server with stdio transport
async function main() {
  const transport = new StdioServerTransport();

  console.error("Web Extractor MCP Server starting...");

  try {
    await server.connect(transport);
    console.error("Web Extractor MCP Server running");
  } catch (error) {
    console.error("Failed to start server:", error);
    process.exit(1);
  }
}

main();
Below is your package.json. It contains metadata like the package name, version, dependencies, and entry points.
{
    "name": "mcp-web-extractor",
    "version": "0.1.0",
    "description": "MCP server for extracting content from web pages",
    "main": "dist/index.js",
    "type": "module",
    "bin": {
      "mcp-web-extractor": "./dist/index.js"
    },
    "scripts": {
      "build": "tsc",
      "start": "node dist/index.js"
    },
    "keywords": [
      "mcp",
      "model-context-protocol",
      "claude",
      "web-extractor"
    ],
    "author": "Your Name",
    "license": "MIT",
    "dependencies": {
      "@modelcontextprotocol/sdk": "^1.0.0",
      "cheerio": "^1.0.0-rc.12",
      "zod": "^3.21.4"
    },
    "devDependencies": {
      "@types/node": "^18.15.11",
      "typescript": "^5.0.4"
    }
  }
And tsconfig.json is below
{
  "compilerOptions": {
    "target": "ES2020",
    "module": "NodeNext",
    "moduleResolution": "NodeNext",
    "esModuleInterop": true,
    "outDir": "./dist",
    "rootDir": "./src",
    "strict": true,
    "declaration": true
  },
  "include": ["src/**/*"]
}
Now build your project:
npm run buildLog in to your npm account (or create one if you don’t have).
npm loginThen, publish your package
npm publishThat’s it! we have built and published the MCP server as a npm package, now anyone can connect this server using
"npx mcp-web-extractor"command from their MCP client.
Here’s how Claude Desktop connects to our published npm package - mcp-web-extractor.
"web_content_extractor": {
  "command": "npx",
  "args": ["mcp-web-extractor"]
}
The complete code is available on GitHub if you want to take a look for your own experiments.
We published our MCP server on PyPI or npm to make it available as a prebuilt server. That way, anyone can install it and connect it to any MCP client. It still runs locally, but packaging makes it easier to share and reuse.
Just like we connected our pre-built MCP server with Claude, you can do the same with any prebuilt server. One example is the Playwright MCP server. Add the config entry like this, and Claude will be ready to use it.
{
  "mcpServers": {
    "playwright": {
      "command": "npx",
      "args": [
        "@playwright/mcp@latest"
      ]
    }
  }
}
We have now seen how to host an MCP server locally and connect it with MCP Client. In the next section, we will move beyond local setups and look at how to host your MCP server on the web, so it is accessible from anywhere. Let’s go!
Remote Hosting of MCP Server
While hosting an MCP server on the web, we will use the SSE transport. It keeps a long-lived connection between the MCP client and MCP server. This is ideal when they are not running on the same machine.
Let’s take the same Web Content Extractor MCP server and update the code to use SSE transport, so we can host it on the web. We will be using TypeScript for this version. We have a single tool called "extract-url", just like before. It takes a URL as input, fetches the page content.
For this remote setup, here’s what we’re working with:
MCP Server → The Web Content Extractor
MCP Client → Claude Desktop
Hosting Platform → Render
Now, here’s the full server code using SSE:
// server.ts
import express from "express";
import { McpServer } from "@modelcontextprotocol/sdk/server/mcp.js";
import { SSEServerTransport } from "@modelcontextprotocol/sdk/server/sse.js";
import { z } from "zod";
import axios from "axios";
import { JSDOM } from "jsdom";
import { Readability } from "@mozilla/readability";

// Create an MCP server
const server = new McpServer({
  name: "web-content-extractor",
  version: "1.0.0"
});

// 🛠️ Tool: extract-url using Readability + jsdom
server.tool(
  "extract-url",
  { url: z.string().url() },
  async ({ url }) => {
    console.log(`Extracting readable content from: ${url}`);
    try {
      const response = await axios.get(url, {
        timeout: 10000,
        headers: {
          "User-Agent": "Mozilla/5.0 (compatible; MCPContentBot/1.0)"
        }
      });

      const dom = new JSDOM(response.data, { url });
      const reader = new Readability(dom.window.document);
      const article = reader.parse();

      if (article?.textContent) {
        return {
          content: [{ type: "text", text: article.textContent }]
        };
      } else {
        return {
          content: [{ type: "text", text: "Could not extract readable content from the page." }]
        };
      }
    } catch (err: any) {
      console.error("Extraction failed:", err.message || err);
      return {
        content: [{ type: "text", text: `Failed to extract content: ${err.message}` }]
      };
    }
  }
);

// Express + SSE setup
const app = express();
const transports: { [sessionId: string]: SSEServerTransport } = {};

app.get("/sse", async (req, res) => {
  const transport = new SSEServerTransport("/messages", res);
  transports[transport.sessionId] = transport;

  console.log("SSE session started:", transport.sessionId);

  res.on("close", () => {
    console.log(" SSE session closed:", transport.sessionId);
    delete transports[transport.sessionId];
  });

  await server.connect(transport);
});

app.post("/messages", async (req, res) => {
  const sessionId = req.query.sessionId as string;
  const transport = transports[sessionId];

  if (transport) {
    await transport.handlePostMessage(req, res);
  } else {
    res.status(400).send("No transport found for sessionId");
  }
});

const PORT = process.env.PORT || 3000;

app.listen(PORT, () => {
  console.log(`MCP Server running on port ${PORT}`);
});
To make SSE work, your server needs to expose two endpoints:
/sse– The client initially connects to this endpoint using a HTTP GET request. The server keeps the connection open and sends responses back using SSE./messages– The client sends messages here using HTTP POST. The server processes them and replies through the open SSE connection.
In the server code, the /sse endpoint is managed by SSEServerTransport, and each client session is saved in a transports object. This setup allows multiple clients to connect without conflict. The server listens on process.env.PORT, which is required by platforms like Render during deployment.
Find the full working version of this project, including
server.ts,package.json, andtsconfig.jsonin the GitHub Repo.
Now that we have built our SSE-based MCP server in TypeScript, let’s deploy it using Render.
Create a new Web Service on Render by connecting the gitHub repo where the code resides.
Fill out the service details
Name: Web-Extractor
Build Command: npm install && npm run build
Start Command: npm start

Environment: “Free” plan (For testing purpose)
Click “Create Web Service”.
Wait for Render to deploy
Once it's deployed, we will get a public URL like:
https://web-extractor-j3jc.onrender.com
Your MCP server is now live and accessible from anywhere.
I have deployed this MCP server on Render, but you can also host it on other platforms like Vercel, Netlify, or any platform that supports web service.
Connecting Remote MCP Server with MCP Client:
As the remote MCP server is live, add the deployment url to your claude_config.json like below.

Claude can now connect to the remote MCP Server. It connects to the /sse endpoint over the internet and run your "extract-url" tool which is hosted in remote.
See the Render logs when Claude tried to connect to the deployed /sse endpoint and call our tool. Once the SSE session started, Claude started making requests to the server. The logs confirm that the server picked up URLs and started extracting content.

Here’s the output Claude showed after calling the tool,

We have now successfully hosted our MCP server on the web and connected it to an MCP client. But as we mentioned earlier in the blog, SSE is not perfect. In the next section, we will look at some of the challenges that come with using SSE in production, and how teams worked around them.
is SSE Good Enough for Production?
So far, we have been using SSE as the transport to host MCP servers on the web. It works. Client connects, the server receives messages, and responses stream back in real-time. But the big question is… does it still hold up when you start scaling, move to production, or deploy in more complex environments?
Let’s be honest. SSE looks great on paper, but once you take it to the cloud, it starts showing some cracks.
These are some common issues teams have faced with SSE in production:
Connections drop randomly in cloud or serverless setups. Not fun when your client is halfway through a response.
Scaling is tricky as maintaining a bunch of long-lived connections becomes a bottleneck, especially with multiple users or tools.
Most browsers only allow 6 concurrent SSE connections per domain. That’s not ideal if someone opens several tabs.
Some firewalls block SSE because of missing headers or the open nature of the stream.
Debugging SSE issues can be painful as it is often unclear whether the problem is in the client, the server, or the network layer.
If you’re building a small tool or doing a quick demo, SSE will probably be fine.
But if you are planning to deploy something real, with multiple users, or want rock-solid reliability then SSE might not be the best fit.
Other MCP Clients You Should Know About
We have been using Claude Desktop as a MCP client throughout this guide. It supports all core MCP features like tools, prompts, and resources. But it is not the only option. There are several other MCP clients that can connect to your servers with different levels of support.
Here are a few worth checking out:
Claude Code – Supports prompts and tools
Cursor – Supports tools
Windsurf – Supports tools
Goose – Supports tools
Zed – Supports prompts
For the full list, check the MCP client matrix.
What’s Next
In this post, we saw how to host your own MCP servers, locally using stdio and on the web using SSE.
There is already a growing number of useful MCP servers out there. But when it comes to MCP clients, the list is still limited. So, in the next post, we will try building our own MCP client. If there is a specific client, you’d like to see us build or explore, drop it in the comments!
Hope this gave you a better understanding on how to host MCP Servers.
I’ve also attached some helpful resources below to dig deeper.
Until we meet next, Happy Coding!