
How to do Local AI Code Generation and Completion using Open-source Llama.cpp?
Learn how you can use Local AI Code Generation LLMs to do code generation and completion

Have you thought about using a GitHub Copilot but worried about code security & privacy?
Were you feeling bad that you miss-out on the productivity boost, cool-tool-use that your friends are flaunting over? But also concerned how to navigate it with a strict management or the area that you are working in?
Enter Llama.vim!
Llama.vim is a local LLM solution works over “vim”, that is useful for developers who prioritize privacy, speed, and offline capabilities.
This blog explores llama.vim, covering its setup, configuration, and how it helps for code completion using a local LLM.
What is llama.vim?
llama.vim, is a Vim plugin, designed to integrate local large language models into your text editor, providing AI-powered code/text assistance.
If you are new to Vim, it’s a free, open-source text editor for Linux, popular among programmers and system admins. It’s a faster, more flexible version of vi, with plugin system for customization.
Why llama.vim?
Vim has many code completion plugins, but llama.vim differs by using a local LLM for code completion, providing AI-powered assistance without relying on external APIs.
Note:- llama.vim requires llama.cpp server to be running as it handles LLM inference with a basic setup.
llama.vim and llama.cpp: How They Work Together
llama.vim acts as a client that connects to llama.cpp's infill API endpoint (http://127.0.0.1:8012/infill-where our local LLM runs) for code completions. When you type in Vim, llama.vim sends the surrounding code context to llama.cpp's server, which returns intelligent code suggestions based on that context.
Since llama.vim depends on llama.cpp for code completion, it won’t work without llama.cpp running.
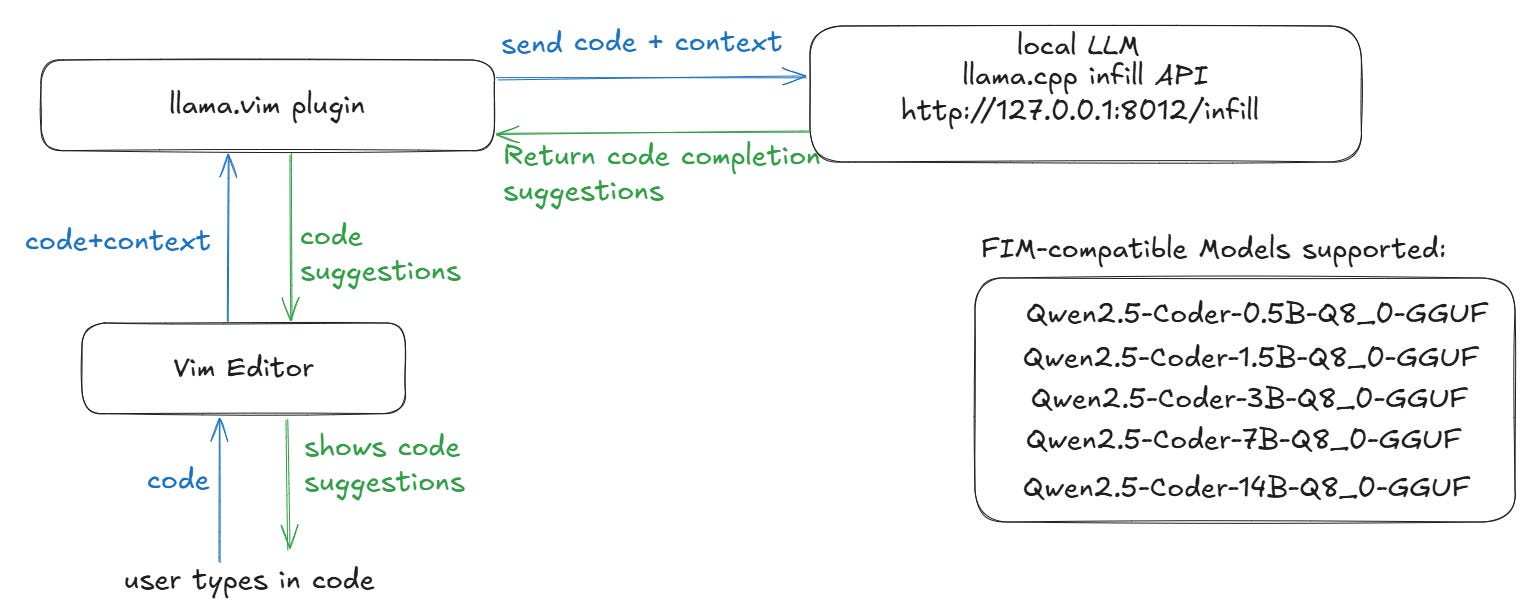
Note:- llama.cpp supports a variety of models, but llama.vim specifically works with FIM-compatible models. To use llama.vim, you need to run a supported model through llama.cpp.
How to install llama.vim?
STEP 1:
Install vim if you have not already
sudo apt-get install vimSTEP 2:
Set up plugin manager (vim-plug)
curl -fLo ~/.vim/autoload/plug.vim --create-dirs \ https://raw.githubusercontent.com/junegunn/vim-plug/master/plug.vim STEP 3:
Create .vimrc configuration file.
(If you don’t already have a .vimrc file, create one by running)
vim ~/.vimrcSTEP 4:
Add Plugin Configuration to vimrc file.
Add the following lines, to your .vimrc file to configure vim-plug and add the llama.vim plugin.
call plug#begin()
Plug 'ggml-org/llama.vim'
call plug#end()
STEP 5:
Install the Plugin
After saving the .vimrc file, run the following command inside Vim to install the plugin
Note:- Press Esc, then type :PlugInstall and hit Enter to install plugins in Vim

Once you type PlugInstall and Enter you will see something like below

llama.vim setup is done, now we need to do llama.cpp set up.
Set Up llama.cpp:
STEP 1:
Clone the llama.cpp repo
git clone https://github.com/ggerganov/llama.cpp cd llama.cppcd llama.cppSTEP 2:
Build llama.cpp.
llama.cpp can be built with different backends.
we built with CUDA support. Please make sure you have CUDA Tool kit installed.
To install CUDA Tool kit, either run below command or download from NVIDIA Developer site.
apt install nvidia-cuda-toolkitNow, build llama.cpp using CMake,
cmake -B build -DLLAMA_CUDA=ON -DCMAKE_BUILD_TYPE=Release -DLLAMA_CURL=ON cmake --build build --config ReleaseSTEP 3:
Run llama-server
Based on your VRAM, choose the model size, and run the llama-server
Here Qwen2.5-Coder-1.5B-Q8_0-GGUF is used. See below,
cd build/bin./llama-server -hf ggml-org/Qwen2.5-Coder-1.5B-Q8_0-GGUF --port 8012 -ngl 99 -fa -ub 1024 -b 1024 --ctx-size 0 --cache-reuse 256When you see "Server listening on http://127.0.0.1:8012" in your terminal, it means the llama.cpp server has started successfully and is ready to process code completions.
Hi there<|im_end|> <|im_start|>user How are you?<|im_end|> <|im_start|>assistant ' main: server is listening on http://127.0.0.1:8012 - starting the main loopTest Code Completion:
Having the set up completed for llama.vim and llama.cpp, Now let us test, how it works in Vim editor.
Auto suggestions will be enabled when you are in insert mode.
Accept the suggestion using Tab.
change the suggestion using ctrl+f.
How to integrate llama.cpp with VS Code?
STEP 1:
Install llama-vscode extension

STEP 2:
By default, endpoint is configured in the extension settings

Before testing, ensure llama.cpp server is running.
In VSCode, start typing code - you'll see AI-powered completions appear automatically as you type.
Conclusion:
Now you know how llama.vim works!
Code assistance is common nowadays, but using a local LLM, provides privacy and offline coding, making it a good choice for developers who prioritize code security and independence from external APIs.
Give it a Try! Happy coding!