
How to implement OAuth for MCP Server
Secure Your Remote MCP Server with OAuth (FastMCP + Auth0)

Anthropic introduced the Model Context Protocol (MCP). Now, developers have started using MCP servers in their workflows. You can now use MCP servers in VSCode, Cursor, and other AI-powered IDEs, or right in your app code, to connect AI with external data. At this point, there’s an MCP server for almost every system you can think of.
I have written articles on MCP covering topics like,
This is my fifth post in this series. Since I haven’t implemented OAuth with MCP servers before, I decided to give it a try and document the process in this blog.
In this blog, I’ll cover:
Quick MCP intro
MCP Transport Types
Understanding OAuth
OAuth Authorization flow for MCP Servers
Build and Deploy OAuth-protected MCP Server
Test OAuth MCP Server
1. Quick MCP intro
For those new to MCP, it’s a Model Context Protocol that connects LLMs with external data. LLMs exist primarily on the client side. MCP clients talk to MCP servers. The server connects to external systems, fetches data, and sends it to the LLM running in the client.
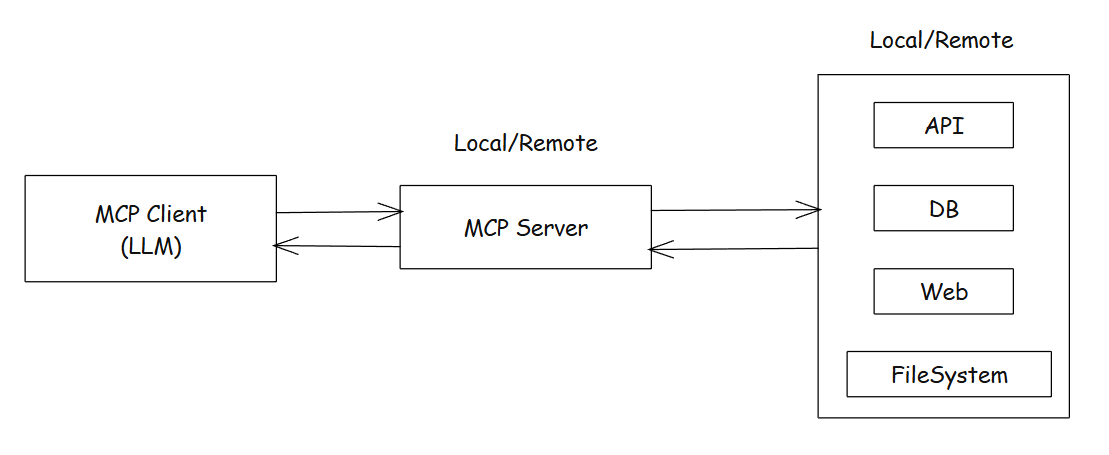
The Model Context Protocol lets you build MCP servers that expose data and functionality to LLMs.
MCP servers have:
Resources (
@mcp.resource) - Expose data to LLMs (like reading files or databases)Tools (
@mcp.tool) - Provide functionality to LLMs (like sending emails or running code)Prompts (
@mcp.prompt) - Define reusable templates for LLM interactions
2. MCP Transport Types
MCP supports different transport types for connecting clients and servers.
STDIO Transport (Local)
Streamable HTTP Transport (Remote)
Custom Transport
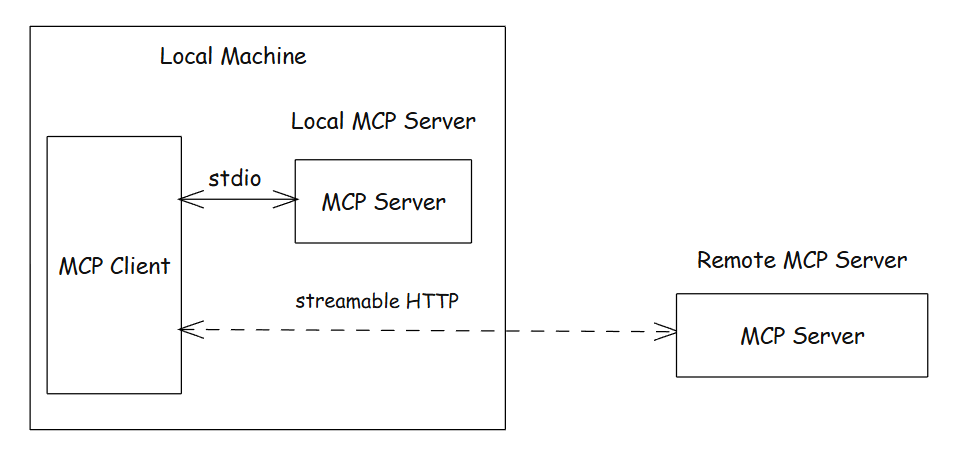
STDIO Transport: (Local)
If you're planning to build a local MCP server that runs on the same machine as your client, use STDIO transport. The client will automatically launch your server as a subprocess when it starts up.
if __name__ == "__main__":
    mcp.run()    # Uses STDIO transport by default
Streamable HTTP Transport: (Remote)
If you're planning to build a remote MCP server that clients can access from different machines, use Streamable HTTP transport. Your server will run as a standalone service that clients can connect to over the network.
if __name__ == "__main__":
   #To use HTTP, specify it in the run() method along with networking options
    mcp.run(transport="http", host="127.0.0.1", port=8000)
This Streamable HTTP Transport replaced the older HTTP+SSE transport method.
Custom Transport
If you need specialized communication between your client and server that doesn't fit STDIO or HTTP patterns, build a custom transport. You define exactly how your client and server will communicate based on your specific requirements.
Here are some key differences between these transports.
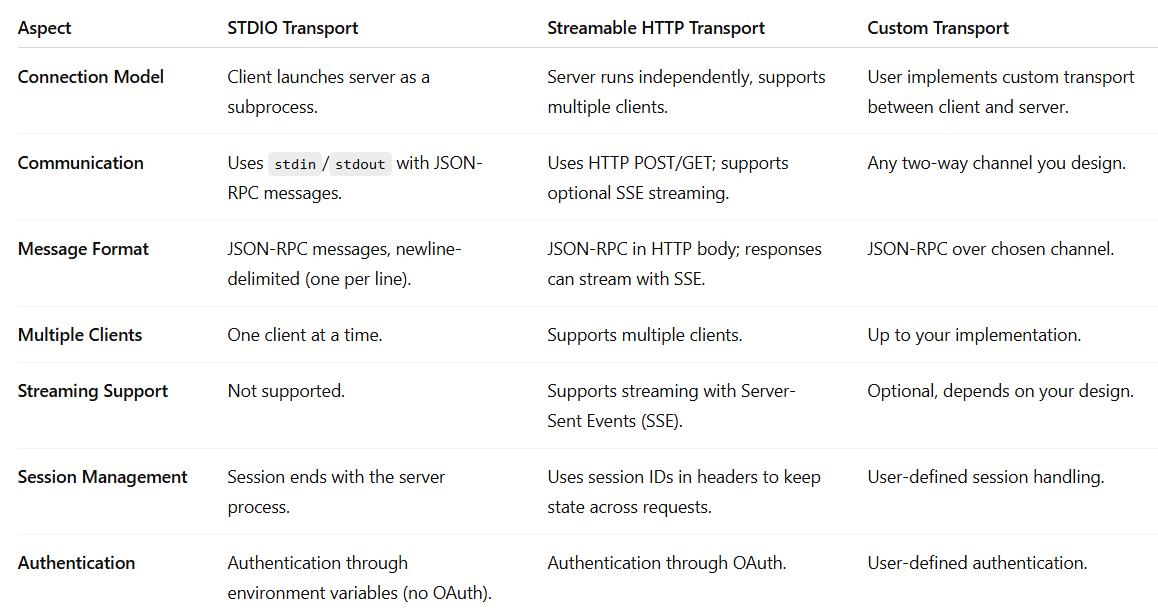
From the above table, we clearly know that OAuth is for remote servers. For Local Servers, credentials can be fetched from environment variables.
3. Understanding OAuth
OAuth is an Open Authorization that lets a client access a server’s resources without the user having to share their credentials.
If no credentials are shared, how does OAuth authorize the client to access the server?
They use access tokens. These tokens are used to authorize the client to access the server.
In the MCP setup, there is a MCP client and a MCP server. When the server has OAuth enabled, it requires every incoming request from the client to include a valid access token. The client attaches this token to each request, and the server verifies it before processing. If the token is valid, the request is allowed, if not, the server blocks it. This ensures that only authorized clients can access the server.
But now a big question comes up.
How does the client get this token?
Here’s how the client obtains an access token in the MCP setup.
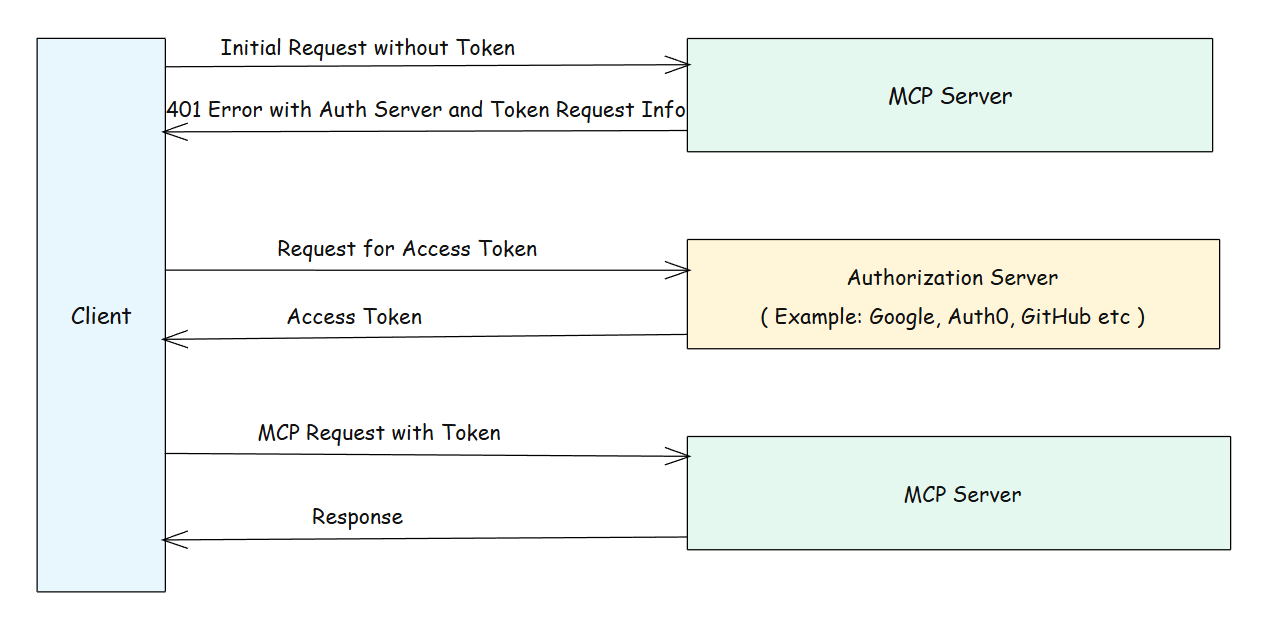
The client sends a first request to the MCP Server without any Token. The MCP server responds with a 401 error along with details about which Authorization Server to use and how to request a token. Using this information, the client contacts the Authorization Server, obtains a token, and then uses it to access the MCP Server.
Access tokens are not only used to authorize clients. They also specify what level of access the client has, such as read or write permissions.
I hope now you have a clear idea of what OAuth is and how it controls access between the client and the server.
4. OAuth Authorization flow for MCP Servers
There are four common types of OAuth flows.
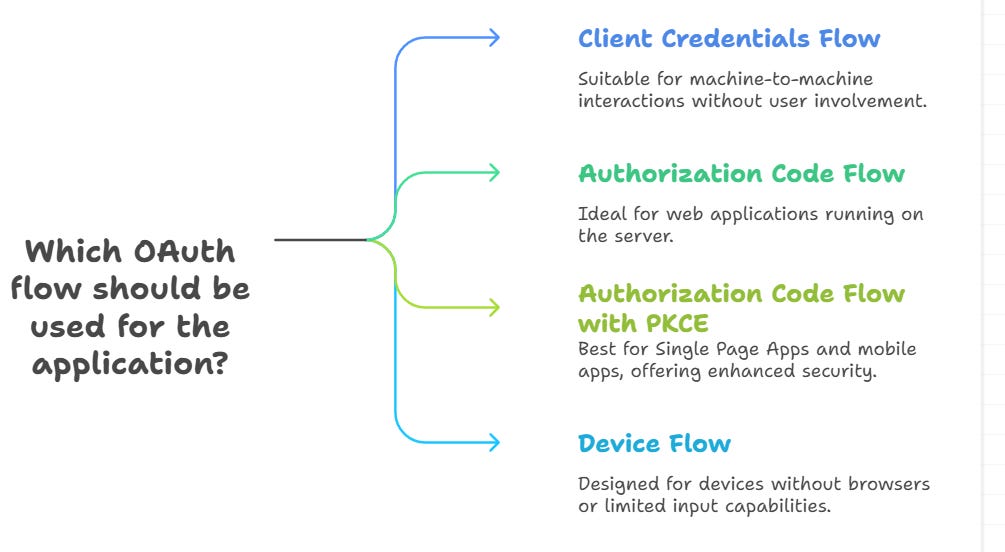
In this blog, we are going to see the Authorization Code Flow With PKCE, as this setup supports dynamic clients where any genuine client can authenticate and use the MCP Server.
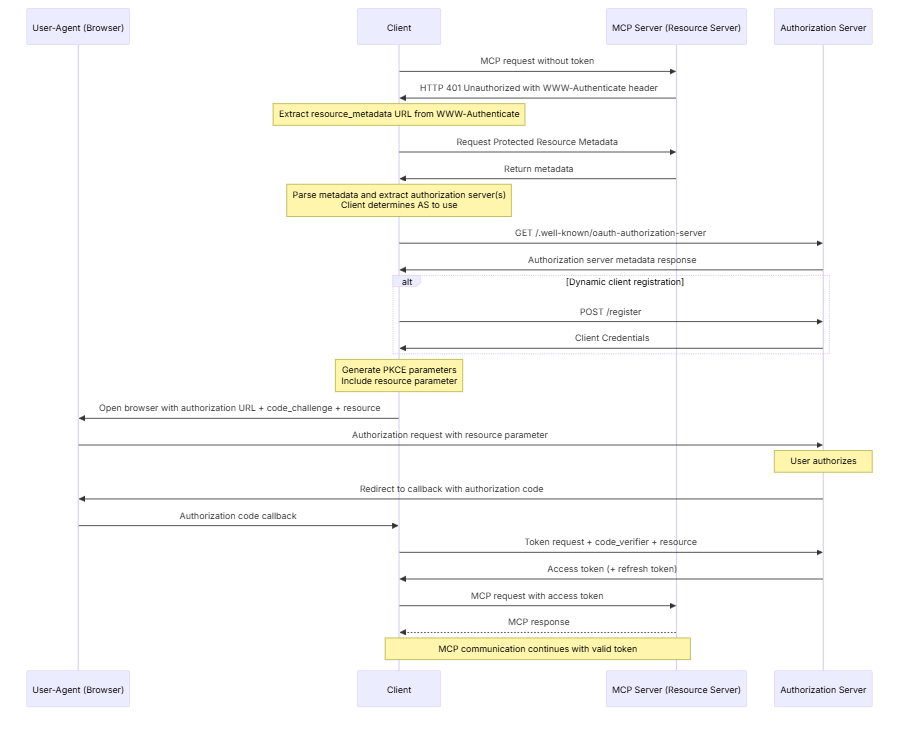
How Authorization Code Flow with PKCE Works
The MCP Client starts by sending a request to the MCP Server without a token.
The MCP Server responds with a 401 Unauthorized and provides authorization server details.
The Client extracts the metadata URL, fetches the metadata, and learns about the authorization and token endpoints, scopes, and supported grant types.
The Client may register itself dynamically with the Authorization Server to obtain client credentials.
The Client generates PKCE parameters (code_challenge, code_verifier) and opens the browser to the Authorization Server’s login page, passing client_id, resource details, and code_challenge.
The User logs in and approves the access request.
The Authorization Server redirects back to the Client with an authorization code.
The Client sends the authorization code along with the code_verifier to the Authorization Server’s token endpoint.
If valid, the Authorization Server returns an access token.
The Client retries the MCP request, now including the access token.
The MCP Server validates the token and grants access.
From this point, the Client continues communicating with the MCP Server using the access token until it expires.
5. Build and Deploy OAuth-protected MCP Server
Now we are going to build MCP Server with OAuth and deploy in Render.
Here’s the simple MCP Server Code with OAuth implemented.
from fastmcp import FastMCP
#from fastmcp.server.auth import RemoteAuthProvider
from fastmcp.server.auth.providers.jwt import JWTVerifier
from pydantic import AnyHttpUrl
import os
import sys
from datetime import datetime
# Read from environment
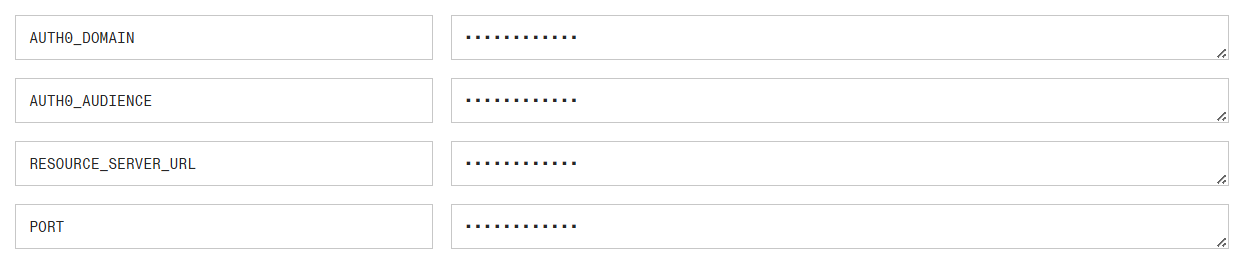
AUTH0_DOMAIN = os.getenv("AUTH0_DOMAIN", "your-tenant.us.auth0.com")
AUTH0_AUDIENCE = os.getenv("AUTH0_AUDIENCE", "https://your-api-identifier")
RESOURCE_SERVER_URL = os.getenv("RESOURCE_SERVER_URL", "https://your-domain.example.com/mcp") # your mcp server deployment url
# JWT verification setup
token_verifier = JWTVerifier(
jwks_uri=f"https://{AUTH0_DOMAIN}/.well-known/jwks.json",
issuer=f"https://{AUTH0_DOMAIN}/", # note the trailing slash
audience=AUTH0_AUDIENCE # must match your API identifier exactly
)
# Remote OAuth provider for MCP
auth = RemoteAuthProvider(
token_verifier=token_verifier,
authorization_servers=[AnyHttpUrl(f"https://{AUTH0_DOMAIN}/")],
resource_server_url=RESOURCE_SERVER_URL # usually your /mcp endpoint
)
mcp = FastMCP(name="Protected MCP Server", auth=auth)
@mcp.tool
def test_str(name: str) -> str:
return f"Hello, {name}!"
if __name__ == "__main__":
port = int(os.environ.get("PORT", 8000))
# Start an HTTP server on port 8000
mcp.run(transport="http", host="0.0.0.0", port=8000)Auth0 Configurations
Quick setup guide for Auth0 configuration required for OAuth-protected MCP server.
Step 1. Create Application
In the Auth0 Dashboard, under Applications, create an application.
Link it to default API - Auth0 Management API or your own API if you plan to create as mentioned in step 2.
Grant the scopes: create:clients, read:clients, update:clients.
Step 2: Create API (Audience)
This step is needed if you want your own API instead of the default Auth0 Management API.
Under Applications → APIs, create a new API (e.g., MCP Server API).
Use a unique identifier (e.g. https://mcp-content-api ) with signing algorithm RS256.
Define scopes such as mcp:read, mcp:write
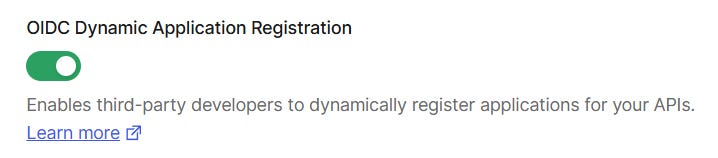
Step 3: Enable Dynamic Client Registration
Go to Auth0 Dashboard
Go to Settings → Advanced tab
Enable "OIDC Dynamic Application Registration"
Step 4: Make the API Identifier as Default Audience
Go to Auth0 Dashboard
Go to Settings → General Tab
Make your Identifier as Default Audience
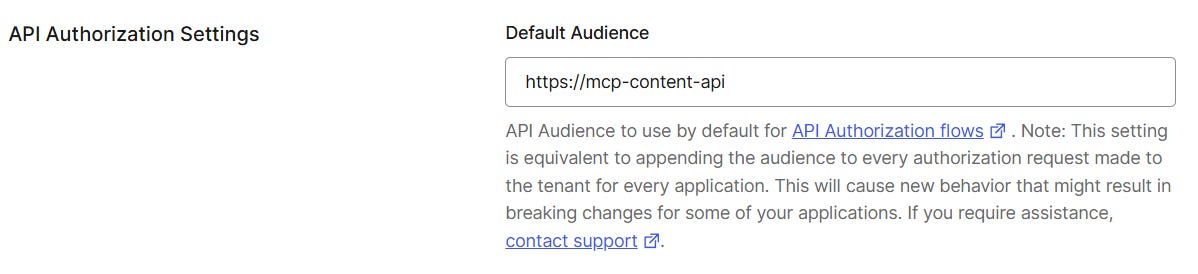
Remember to do step 3, and 4. Else you will not be able to connect your MCP Server from client even after authorization.
With Auth0 configured, we can now deploy the MCP Server on Render.
Deploy Remote MCP Server
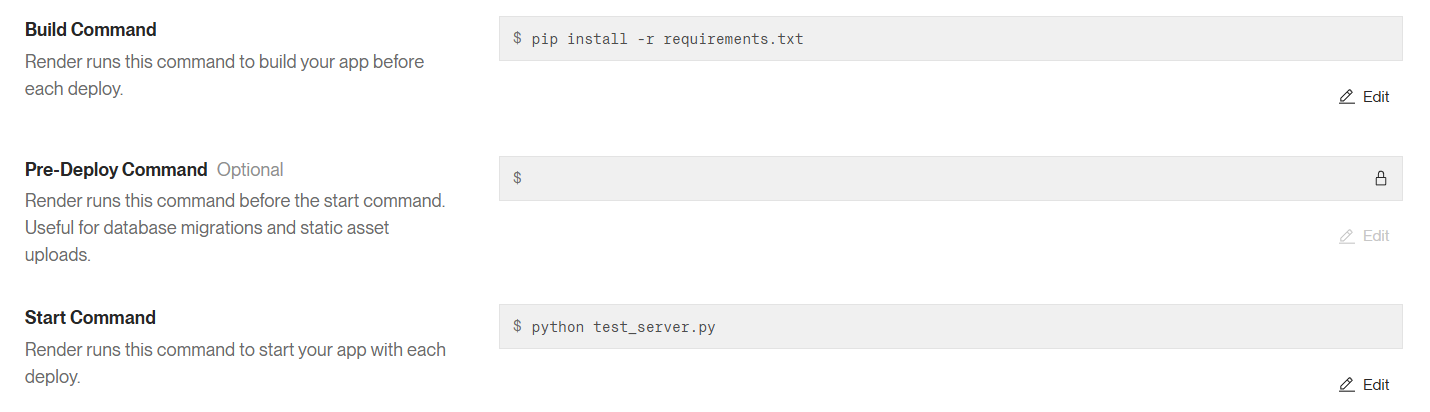
In Render Dashboard, Create Web Service from Git repo.
Set the Build Command:
pip install -r requirements.txtSet the Start Command:
python server.py
Add Environment Variables

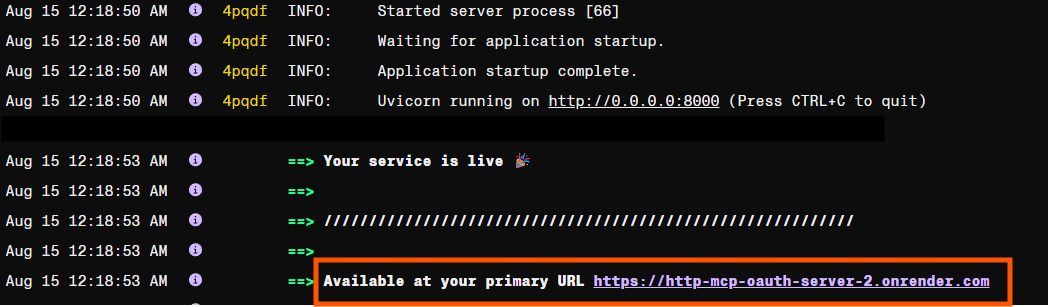
Click Deploy - MCP Server will be live at the Render URL

6. Test OAuth MCP Server
I connected this remote OAuth MCP Server through MCP Inspector.
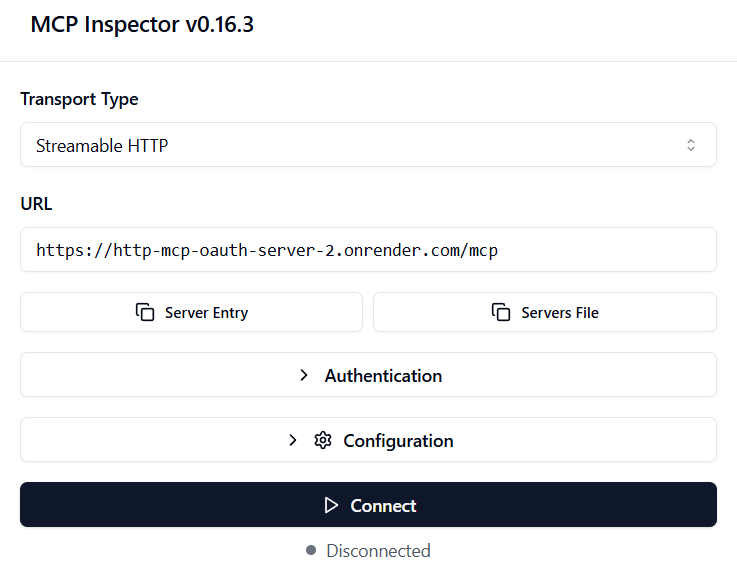
When you click Connect, the authorization flow begins.
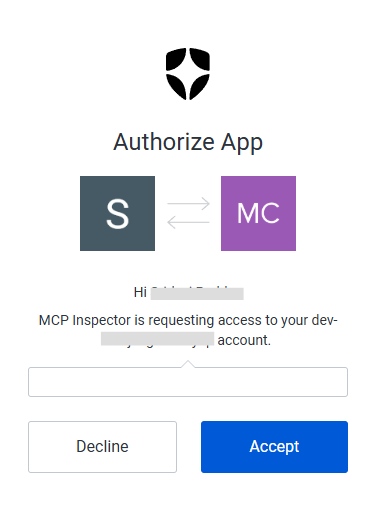
After you approve the request, MCP Inspector establishes the connection and loads the tools from the server.
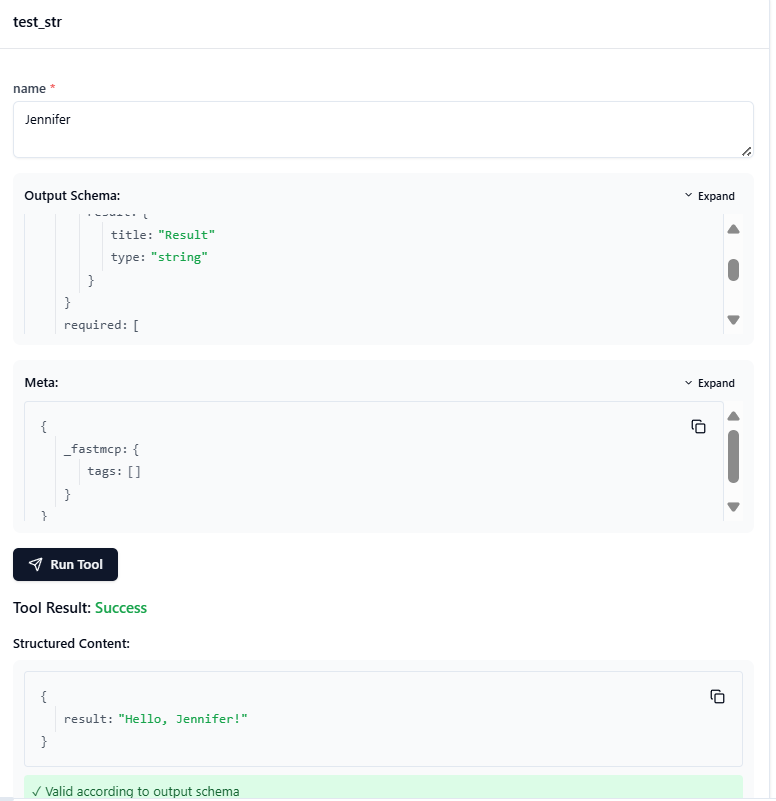
Now test the tool from our MCP server: Enter a name, and the server responds with Hello {name}.
This is how it works.
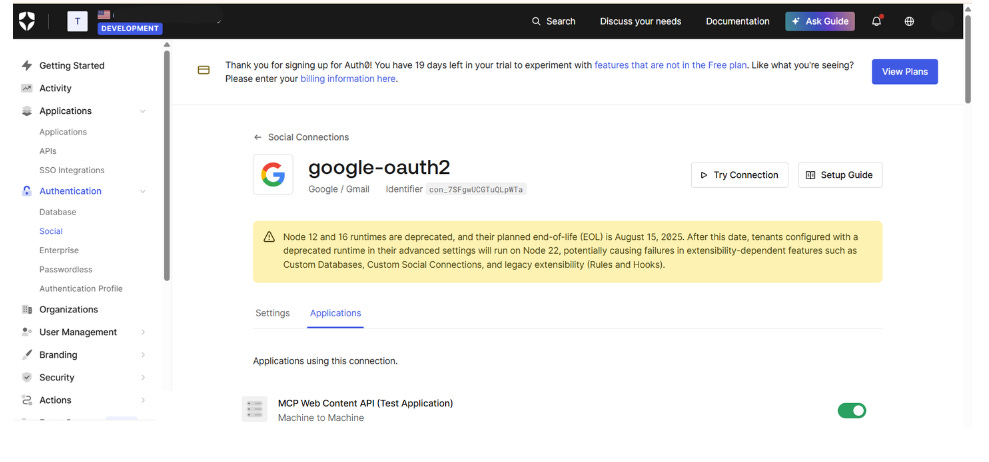
Enable Google OAuth in Auth0
To allow users to sign in with Google, enable the Google OAuth in Auth0.
In the Auth0 Dashboard, go to Authentication → Social → Google OAuth.
Under Applications, turn on the toggle for your application.
Save the changes.
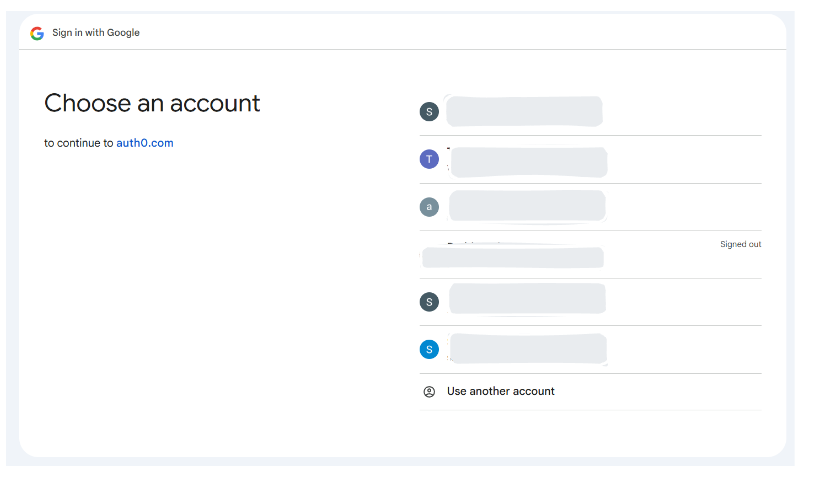
Once enabled, users can sign in to the MCP server using their Google account.
Conclusion
We walked through how to add OAuth to an MCP server step by step.
I couldn’t find a clear guide on setting up OAuth for an MCP server, so I put this together to show a simple, working flow from start to finish. The code and settings here are tested and working, and this MCP Server can work with other MCP clients too.
You can use any OAuth provider. Just wire it to your MCP server and see how it works for you.
Happy learning!