

I have been writing a lot about MCP lately. I have covered topics like building MCP server and hosting MCP server. Those posts were widely read across the community and now building an MCP client felt like the next obvious topic. I had been meaning to write about it for a while, and I am glad I finally got around to it.
If you are new to MCP, you might want to check out my earlier posts where I covered what Model Context Protocol is all about. They will give you the background on MCP and MCP servers, which will help you follow this post on building clients much more easily.
MCP servers have been picking up fast lately, with more people building and expanding the ecosystem. But when it comes to MCP clients, it's still a pretty niche space. So far, only a handful of MCP clients exist. So, with this post, I just wanted to make it easier for anyone looking to get started with building MCP Client.
We will cover,
What is MCP Client
How to build MCP Client
Connect MCP Client to Local, Pre-built, Remote MCP Server
But before that:
What is MCP Client
MCP Client is a protocol client that maintains one to one connection with MCP Server. It is basically a piece that runs inside the MCP host app, such as Claude Desktop or any custom LLM-powered tool and allows the host to access external data or remote services through connected MCP servers.
Any program that speaks the Model Context Protocol language and hooks up to MCP Servers can function as an MCP Client. It's beautifully simple when you break it down
LLM + Transport Layer + Protocol Implementation = MCP Client.

Some popular MCP Clients are:
Claude Desktop App
Cursor
Windsurf
Goose
VS Code Editor, and there is few more.
While the previous diagram covered the high-level MCP client flow, the one below takes a closer look at how the MCP client and MCP server communicates step by step during a session.
To make it even clearer, here is a breakdown of the steps involved.
Capture the user query
Establishes connections to MCP servers
Discovers server tools via the
tools/listendpointForwards user queries and available tools to LLM
Processes LLM responses to identify tool calls
Executes tools using the server's
tools/callendpointReturns tool results to the LLM for continued conversation
The communication between the MCP client and server follows the Model Context Protocol (MCP) specification.
Now that we have a basic idea of what an MCP client is, let us build one step by step. Once we put it into practice, the concepts will make a lot more sense and feel less abstract.
How to build an MCP Client
As shown in the earlier diagram, the MCP client acts as a bridge between the MCP Host and MCP server, orchestrating the flow from user query to tool execution between the LLM and MCP server.
You can build an MCP client that integrates with any LLM.
Most of the client code remains the same no matter which model we use. The only part that really changes is how the client interacts with the LLM. This is where the code starts to differ. The client has to send the user’s query along with the available tools, check if the LLM wants to call any of them, and then continue the conversation after the tool runs. Each LLM does this differently. Claude and OpenAI have their own APIs and response formats, so this part of the code needs to be written based on which model we are using.
The common and the LLM specific code areas are given below.
Capturing and Processing user queries (common)
Connecting to MCP servers (common)
Discovering available tools through
tools/list(common)Translating tool definitions for LLM compatibility (LLM Specific)
Forwarding user queries to LLMs with available tools (LLM Specific)
Processing LLM responses to identify tool calls (LLM Specific)
Executing tool calls through
tools/call(common)Sending tool results to the LLM for continued conversation (LLM Specific)
Returning results from LLM to users (common)
Now we will build MCP Clients with OpenAI and Claude. We will walk through the common code areas as well as LLM specific sections, highlighting how the implementation differs between an OpenAI-based client and a Claude-based one.
Environment Setup (Common)
# Create project directory
mkdir mcp-client
cd mcp-client

# Initialize npm project
npm init -y

# Install common dependencies
npm install @modelcontextprotocol/sdk dotenv

# Install dev dependencies
npm install -D @types/node typescript
For Claude Integration (LLM Specific)
# Install Anthropic SDK
npm install @anthropic-ai/sdk

# Create .env file with Anthropic API key and Model
echo "ANTHROPIC_API_KEY=your_key_here" > .env
echo "ANTHROPIC_MODEL=claude-3-5-sonnet-20241022" >> .env
For OpenAI Integration (LLM Specific)
# Install OpenAI SDK
npm install openai

# Add OpenAI API key and model to .env file
echo "OPENAI_API_KEY=your_key_here" >> .env
echo "OPENAI_MODEL=gpt-4o" >> .env
Create client.ts (MCP Client)
1. Capturing and Processing User Queries (Common)
This code sets up an interactive command-line interface where users can type their queries. It uses the readline module to keep prompting for input, processes the query through the client logic, and sends it to the LLM. The response is then displayed back to the user in real time.
import * as readline from "node:readline";

async chatLoop(): Promise<void> {
  console.log("\nMCP Client Started!");
  console.log("Type your queries or 'quit' to exit.");

  // Create readline interface for interactive input/output
  const rl = readline.createInterface({
    input: process.stdin,
    output: process.stdout,
  });

  // Define recursive question function
  const askQuestion = () => {
    rl.question("\nQuery: ", async (query: string) => {
      try {
        // Handle quit command
        if (query.toLowerCase() === "quit") {
          await this.cleanup();
          rl.close();
          return;
        }

        // Process user query
        const response = await this.processQuery(query);
        console.log("\n" + response);

        // Ask for next query
        askQuestion();
      } catch (error) {
        console.error("\nError:", error);
        askQuestion();
      }
    });
  };

  // Start the question loop
  askQuestion();
}

async cleanup(): Promise<void> {
  if (this.transport) {
    await this.transport.close();
  }
}
2. Establishing connections to MCP servers (Common)
This section handles setting up the connection between our MCP client and the MCP server. It first checks whether we are connecting to a Python or JavaScript server, then sets up the appropriate transport layer. Once that is ready, it initiates the MCP client, configures it and connects to the server through the transport. Think of this as building the bridge that the client will use to communicate with the server. Without this step, nothing else can move forward.
import { Client } from "@modelcontextprotocol/sdk/client/index.js";
import { StdioClientTransport } from "@modelcontextprotocol/sdk/client/stdio.js";

async connectToServer(serverScriptPath: string): Promise<void> {
  console.log(`Connecting to server at: ${serverScriptPath}`);

  // Determine server type based on file extension
  const isPython = serverScriptPath.endsWith(".py");
  const isJs = serverScriptPath.endsWith(".js");

  if (!isPython && !isJs) {
    throw new Error("Server script must be a .py or .js file");
  }

  // Select appropriate command based on server type
  const command = isPython ? "python" : "node";
  console.log(`Using command: ${command}`);

  // Create transport for communicating with the server
  this.transport = new StdioClientTransport({
    command,
    args: [serverScriptPath],
  });

  // Create and configure MCP client
  this.client = new Client(
    {
      name: "mcp-client",
      version: "1.0.0",
    },
    {
      capabilities: {},
    }
  );

  // Connect to the server
  await this.client.connect(this.transport);
  console.log("Connected to MCP server successfully");
}
3. Discovering tools via the tools/list endpoint (Common)
This part is pretty straightforward. Client asks the MCP server "hey, what tools do you have?" by hitting the tools/list endpoint. The server responds with complete list of available tools.
import { ListToolsResultSchema } from "@modelcontextprotocol/sdk/types.js";

async discoverServerTools() {
  if (!this.client) {
    throw new Error("Client not connected to server");
  }

  // Request the list of available tools from the server
  console.log("Discovering available tools...");
  const toolsResponse = await this.client.request(
    { method: "tools/list" },
    ListToolsResultSchema
  );

  // Log discovered tools
  console.log(
    "Connected to server with tools:",
    toolsResponse.tools.map((tool: any) => tool.name)
  );

  return toolsResponse.tools;
}
4. Prepare tool information + user query for LLM (LLM-specific)
This is where the code starts to differ based on the LLM we are using. At this stage, the client needs to format the user query and tool definitions to match the specific API structure expected by the LLM.
OpenAI and Claude handle this differently. OpenAI expects tools to be wrapped in a nested functions structure, while Claude uses a flatter format with slightly different field names. So, this part of the client code needs to be written based on the model we are working with.
If you are using OpenAI or Claude, follow the respective format shown below. For any other LLM, refer to its API documentation, and write your code accordingly.
OpenAI Implementation:
// For OpenAI
formatToolsForOpenAI(tools: any[]) {
  // Format tools according to OpenAI's requirements
  return tools.map(tool => ({
    type: "function" as const,
    function: {
      name: tool.name,
      description: tool.description || "",
      parameters: tool.inputSchema
    }
  }));
}
Claude Implementation:
// For Claude
formatToolsForClaude(tools: any[]) {
  // Format tools according to Claude's requirements
  return tools.map(tool => ({
    name: tool.name,
    description: tool.description,
    input_schema: tool.inputSchema,
  }));
}
5. Forwarding user queries to LLMs with available tools (LLM-specific)
Once the query and tools are prepared, the next step is to send them to the LLM’s API. This part also differs based on the model we are using, as each LLM expects the request in a specific format when working with tools.
For OpenAI and Claude, the code structure is shared below. As already mentioned, if you are using a different LLM, you need to refer to its API docs and implement this part of the code based on its specific request and response format.
OpenAI Implementation:
import OpenAI from "openai";

// Initialize in constructor
constructor(config: MCPClientConfig = {}) {
  const apiKey = process.env.OPENAI_API_KEY;
  if (!apiKey) {
    throw new Error("OPENAI_API_KEY environment variable is not set");
  }
  this.openai = new OpenAI({ apiKey });
}

// OpenAI query processing
async processQueryWithOpenAI(query: string, formattedTools: any[]): Promise<any> {
  // Initialize conversation with user query
  const messages = [
    {
      role: "system",
      content: "You are a helpful assistant that can use tools."
    },
    {
      role: "user",
      content: query,
    },
  ];

  // Send the query and tools to OpenAI
  console.log("Sending query to OpenAI...");
  return await this.openai.chat.completions.create({
    model: process.env.OPENAI_MODEL,
    messages: messages as any,
    tools: formattedTools,
    tool_choice: "auto" as const,
  });
}
Claude Implementation:
import Anthropic from "@anthropic-ai/sdk";

// Initialize in constructor
constructor(config: MCPClientConfig = {}) {
  const apiKey = process.env.ANTHROPIC_API_KEY;
  if (!apiKey) {
    throw new Error("ANTHROPIC_API_KEY environment variable is not set");
  }
  this.anthropic = new Anthropic({ apiKey });
}

// Claude query processing
async processQueryWithClaude(query: string, formattedTools: any[]): Promise<any> {
  // Initialize conversation with user query
  const messages = [
    {
      role: "user",
      content: query,
    },
  ];

  // Send the query and tools to Claude
  console.log("Sending query to Claude...");
  return await this.anthropic.messages.create({
    model: process.env.ANTHROPIC_MODEL,
    max_tokens: 1000,
    messages,
    tools: formattedTools,
  });
}
6. Processing LLM responses to identify tool calls (LLM-specific)
After the LLM responds, the client needs to check whether the model wants to call any tools. This part also varies across models because the structure of the response is different for each LLM.
OpenAI returns tool calls in a dedicated tool_calls array, while Claude includes them inside content blocks marked as "tool_use". So, the client needs to parse the response accordingly and extract any tool calls that need to be executed.
OpenAI Implementation:
// Process OpenAI response to identify tool calls
processOpenAIResponse(response: any, messages: any[]): {
  toolCalls: any[],
  textContent: string[],
  updatedMessages: any[]
} {
  const responseMessage = response.choices[0].message;
  const textContent = [];
  const toolCalls = [];

  // Add the assistant's message to the conversation
  messages.push(responseMessage);

  // Handle text response
  if (responseMessage.content) {
    textContent.push(responseMessage.content);
  }

  // Extract tool calls
  if (responseMessage.tool_calls && responseMessage.tool_calls.length > 0) {
    toolCalls.push(...responseMessage.tool_calls);
  }

  return {
    toolCalls,
    textContent,
    updatedMessages: messages
  };
}
Claude Implementation:
// Process Claude response to identify tool calls
processClaudeResponse(response: any, messages: any[]): {
  toolCalls: any[],
  textContent: string[],
  updatedMessages: any[]
} {
  const responseContent = response.content;
  const textContent = [];
  const toolCalls = [];

  // Add the assistant's message to the conversation
  messages.push({
    role: "assistant",
    content: responseContent
  });

  // Process different content types
  for (const content of responseContent) {
    if (content.type === "text") {
      textContent.push(content.text);
    } else if (content.type === "tool_use") {
      toolCalls.push({
        id: content.id,
        name: content.name,
        args: content.input
      });
    }
  }

  return {
    toolCalls,
    textContent,
    updatedMessages: messages
  };
}
7. Execute tools using the server's tools/call endpoint (common)
Once a tool call is identified, the client communicates with the MCP server to execute it. This step is common because it happens between the MCP client and server and not with the LLM.
The client sends a request to the server’s tools/call endpoint, passing the tool name and its arguments. The server runs the tool and returns a response, which the client then processes and gets ready to send back to the LLM.
import { CallToolResultSchema } from "@modelcontextprotocol/sdk/types.js";

// Execute a tool through the MCP server
async executeTool(toolName: string, toolArgs: any): Promise<any> {
  if (!this.client) {
    throw new Error("Client not connected");
  }

  console.log(`Executing tool: ${toolName} with args: ${JSON.stringify(toolArgs)}`);

  try {
    // Call the tool through MCP
    const result = await this.client.request(
      {
        method: "tools/call",
        params: {
          name: toolName,
          arguments: toolArgs,
        },
      },
      CallToolResultSchema
    );

    // Format the result for easier consumption
    let toolResultText = "";
    if (Array.isArray(result.content)) {
      toolResultText = result.content
        .filter(item => item.type === "text")
        .map(item => item.text)
        .join("\n");
    } else {
      toolResultText = JSON.stringify(result.content);
    }

    console.log(`Tool result: ${toolResultText.substring(0, 100)}${toolResultText.length > 100 ? '...' : ''}`);
    return {
      raw: result,
      formatted: toolResultText
    };
  } catch (error) {
    console.error(`Error executing tool ${toolName}:`, error);
    throw error;
  }
}
8. Send tool results back to the LLM to continue the conversation (LLM-specific)
Once the MCP server executes the tool and returns the result, the client needs to pass that result back to the LLM so the conversation can continue.
Different LLMs expect this result in different formats. For example, OpenAI requires the client to send the tool result as a message with the special "tool" role, including the tool call ID and function name. Claude, on the other hand, expects the result to be wrapped as a structured object inside a user message. So, our client code should format and send the tool result according to the LLM’s expected message structure.
OpenAI Implementation:
// Send tool results back to OpenAI
async sendToolResultsToOpenAI(
  toolCall: any,
  toolResult: string,
  messages: any[],
  formattedTools: any[]
): Promise<any> {
  // Add the tool response to the conversation
  messages.push({
    role: "tool",
    tool_call_id: toolCall.id,
    name: toolCall.function.name,
    content: toolResult,
  });

  // Get the next response from OpenAI with the tool result
  console.log("Sending tool results to OpenAI...");
  return await this.openai.chat.completions.create({
    model: "gpt-4o",
    messages: messages as any,
    tools: formattedTools,
    tool_choice: "auto" as const,
  });
}
Claude Implementation:
// Send tool results back to Claude
async sendToolResultsToClaude(
  toolCall: any,
  toolResult: string,
  messages: any[],
  formattedTools: any[]
): Promise<any> {
  // Add the tool response to the conversation
  messages.push({
    role: "user",
    content: [
      {
        type: "tool_result",
        tool_use_id: toolCall.id,
        content: [
          { type: "text", text: toolResult },
        ],
      },
    ],
  });

  // Get the next response from Claude with the tool result
  console.log("Sending tool results to Claude...");
  return await this.anthropic.messages.create({
    model: "claude-3-5-sonnet-20241022",
    max_tokens: 1000,
    messages,
    tools: formattedTools,
  });
}
9. Response from LLM
After receiving the tool result, the LLM processes it and generates the next response in the conversation. This final response could be an answer, a summary, or a follow-up instruction, and it is returned to the user as the output from the MCP client.
We just walked through the major building blocks of an MCP client. If you want to see how everything fits together, I have shared the full working code on GitHub repo including both the OpenAI and Claude versions. The repo contains everything you need to run it -
openai-client.ts, claude-client.ts, package.json, tsconfig.json,and aREADME.mdto help you get started easily.
Now Build your client
# Build TypeScript
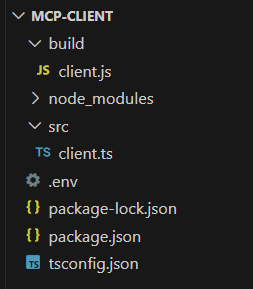
npm run buildOnce you run the build command, your project structure will look like this. The original TypeScript file stays in the src folder and the compiled client.js will appear inside the build directory.
Run MCP Client
Now that the build is complete, you can run your MCP client by passing the MCP server path as an argument. Use the appropriate command below depending on whether your server is written in Python or Node.js.
# Run the client
node build/client.js path/to/server.py         # python server
node build/client.js path/to/build/index.js    # node server
Test your MCP Client:
MCP Client + Local MCP Server
To connect your MCP client with a local MCP server, run the client and provide the server script path, as an argument. I had a local Gmail MCP server, and the client was able to connect and fetch the data I requested.
Here is a quick look at the tools exposed by my Gmail MCP server, and how the client used one of them to pull the "from" addresses of my last three emails. You can see the tool call and execution in action below.

MCP Client + Prebuilt MCP Server
While working on MCP clients, I came across this library called mcp-use. It includes a built-in client that can connect to both prebuilt and remote MCP servers with minimal setup.
Earlier, we built our own client and connected it to a local MCP server by passing the server path directly. This time, we will use mcp-use to connect to a prebuilt server, in this case filesystem server that is available as a npm package.
To do that, we just need to add the configuration of the filesystem MCP server. Here is the code I used to set up the client and connect to the filesystem server using OpenAI as the LLM.
import asyncio
import os
from dotenv import load_dotenv
#import readline # For better terminal input experience
from langchain_openai import ChatOpenAI
from mcp_use import MCPClient, MCPAgent
OPENAI_API_KEY = "Your_OpenAI_API_Key"
# Configuration for a prebuilt MCP server (GitHub server in this example)
CONFIG = {
"mcpServers": {
"filesystem": {
"command": "npx",
"args": [
"-y",
"@modelcontextprotocol/server-filesystem",
"C:/Users/sride/OneDrive/Desktop",
]
}
}
}
async def main():
# Load environment variables for API keys
load_dotenv()
# Create the MCP client from our configuration
client = MCPClient.from_dict(CONFIG)
# Initialize the LLM (using Claude in this example)
llm = ChatOpenAI(model="gpt-4o", openai_api_key=OPENAI_API_KEY)
# Create the agent with our client and LLM
agent = MCPAgent(llm=llm, client=client, max_steps=15)
print("MCP Terminal Interface")
print("Connected to GitHub MCP Server")
print("Type 'exit' to quit\n")
# Main interaction loop
while True:
# Get user input
user_query = input("Query: ")
# Check for exit command
if user_query.lower() in ["exit", "quit"]:
print("Goodbye!")
break
# If query is not empty, process it
if user_query.strip():
print("Processing query... (this may take a moment)")
try:
# Run the query through the agent
result = await agent.run(user_query)
print("\n--- Result ---")
print(result)
print("-------------\n")
except Exception as e:
print(f"Error: {str(e)}")
if __name__ == "__main__":
try:
asyncio.run(main())
except KeyboardInterrupt:
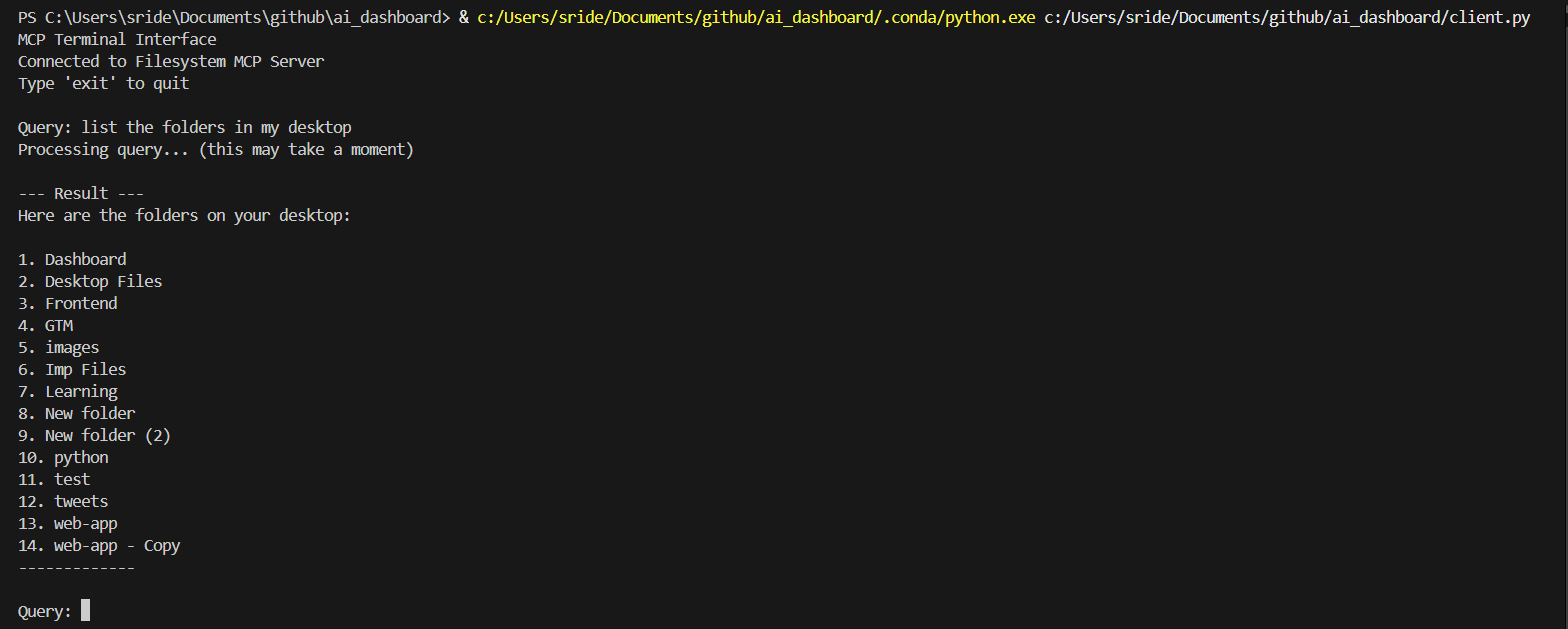
print("\nOperation cancelled by user. Exiting...")The Filesystem MCP server connects to your local files and folders. Once my client was connected to the server, I asked it to list the folders on my Desktop, and it worked just as expected.
The setup works the same for other prebuilt servers too. For example, I also tested it with the Playwright MCP server, and it worked without any changes to the client logic.
You just need to replace the filesystem server details with the Playwright server details in the same code.
MCP Client + Remote MCP Server
So far, we have built and tested our MCP client with local servers, and with prebuilt servers using mcp-use. Now, let us see how mcp-use works with remote MCP servers.
To connect to a remote server, there is no change needed in the client logic. Just replace the prebuilt server config with your remote MCP server configuration, like shown below. As long as your remote server is running and ready to accept connections, the client works exactly the same.
Below is the config I used for my remote MCP server. Place this into your existing mcp-use setup by replacing the prebuilt config.
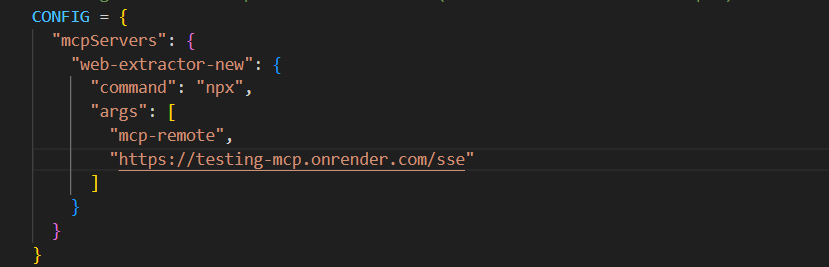
This particular MCP server is one I deployed on Render. It takes a URL as input and returns the extracted text from the page. If you have read my earlier blog on hosting MCP servers, this config might look familiar.
Here is how it works in action:

And just to show you what happens on the server side- as soon as my client connected to the remote MCP server, I could see the SSE session, tool call and other related logs appearing in the Render log console.

What Next
By now, you should have a clear idea of how to build an MCP client and connect it with local, prebuilt, and remote MCP servers.
Recently, Anthropic announced that Claude now supports external tools through remote MCP servers, across both desktop and web versions. When AI systems are able to access external tools, their knowledge becomes more dynamic and the potential for automation grows significantly.
That is the direction this ecosystem is moving toward, and now you have everything you need to be part of it.
Happy Coding!
Thank you so mcuh.
May I ask that can I use the playwright mcp server on azure ai foundry playground?
Is it possible that deploy the playwright mcp server on azure container resource and use from azure foundry playground?
Thanks