

Google has announced Agent2Agent (A2A) Protocol, on April 9th, 2025. In the world of AI, each new release is not just seen as a step forward in innovation, it also invites a comparison with existing standards to identify the specific gaps it aims to address. Let us see where this A2A protocol fits in today’s AI space.
We know agents have been transforming the way we work. Enterprises now deploy agents to scale operations. But isolated agents have limited impact. When agents can work together, regardless of who built them or what framework they use, they become more autonomous and more productive.
MCP connects AI System to external tools and data, but there is no common way for Agents to talk to each other, especially when each one is built with different framework or comes from a different provider. That is exactly the gap Google’s A2A Protocol fills.
If you would like to know how MCP works, feel free to check out my previous blogs on MCP.
This blog is going to cover:
What is Agent2Agent (A2A) Protocol
Key Terms in A2A
How A2A works
Sample JSON-RPC communication between A2A Client and A2A Server
A2A vs MCP
A2A Multi Agent System Hands-on
The Future of MCP + A2A
What is A2A Protocol
A2A is a protocol provides a standard way of communication between AI agents regardless of their underlying framework or provider. It is built on top of existing standards like HTTP, SSE and JSON-RPC.

Key Terms in A2A Protocol
Here are some of the terms you will encounter throughout the A2A protocol.
Client Agent (A2A Client):
Client Agent is a Task Giver. An agent that gives task to another agent.
Remote Agent (A2A Server):
Remote Agent is a Task Executor. An agent that receives and executes the task.
A Task is always created by the Client Agent, and the Task Status is always determined by the Remote Agent.
Agent Card:
Agent card is a JSON file containing Agent’s capabilities, skills. This card is published by every remote agent, so client agent can read this information and decide the best remote agent for the task.
Message:
Any messages between Client Agent and Remote Agent go in the "message" field. Message can include user request, agent thoughts, user context, instructions, errors, status, or metadata.
For Example, Client Agent asks for the stock analysis, and the input is attached inside
"message.parts.text".
Task results are not included in the "message" field. Instead, they are attached in the "artifacts" field as shown below.
Artifacts:
When Remote Agent completes a task, it attaches the final result in the "artifacts" field of the JSON response sent to the Client Agent. Artifact field contains the task result, with each artifact having a specific name and related details.
Once the Remote Agent finishes the stock analysis, the task result is attached in the
"artifacts.parts.text".
Both
"message"and"artifacts"include a"parts"field, where the actual content is stored.


Now let us see in detail how A2A works.
How A2A Works
1. Agent discovery:
Google suggests Remote Agents to publish Agent Card at the below endpoint. So, Client Agent can discover the Remote Agents. We call this as an Agent Discovery.
https://
base-url/.well-known/agent.json.Client Agent makes HTTP GET request to retrieve the Agent Card.
Client Agent identifies the best agent after reviewing the Agent Cards of multiple remote agents.
Agent Cards may contain sensitive information. Companies can use security mechanisms like mTLS to protect them, ensuring cards at well-known paths are only accessible to authorized clients.
2. Task Processing:
Client Agent uses
"tasks/send"method for sending normal task to Remote Agent.Client Agent uses "
tasks/sendSubscribe" method for streaming tasks.We can check an Agent's streaming capability by looking at its Agent Card. If streaming flag is set to true, then the Agent supports streaming.
Once the task is initiated, the Remote Agent can do any of the following
Complete the task right away.
Schedule the task for later.
Decline the request.
Suggest using a different method.
Ask for additional details from the client.
Pass the task along to another agent or system.
Normal Task:
For normal task Client uses "tasks/send" method, for sending task to the Remote Agent. Remote Agent completes your request and sends back one final response. This response has the task status as completed and the Artifact (the final result) with some metadata.
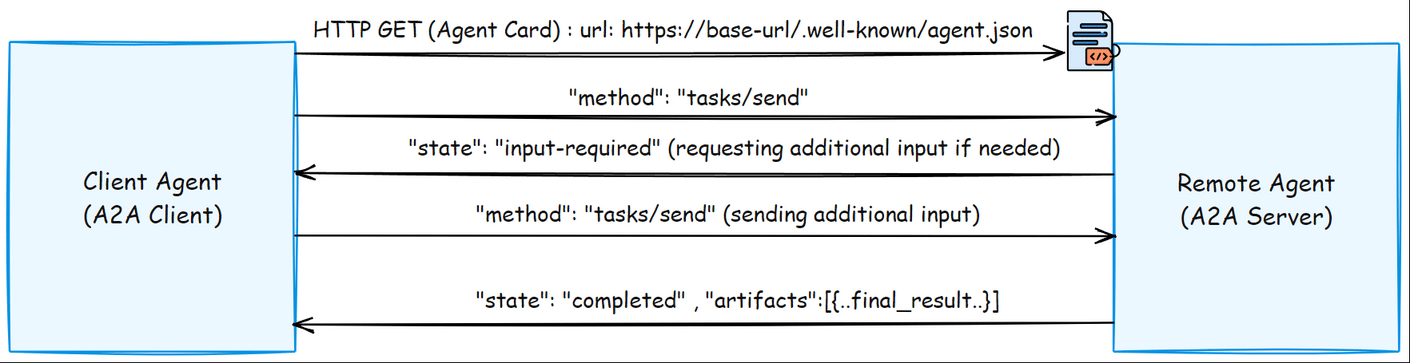
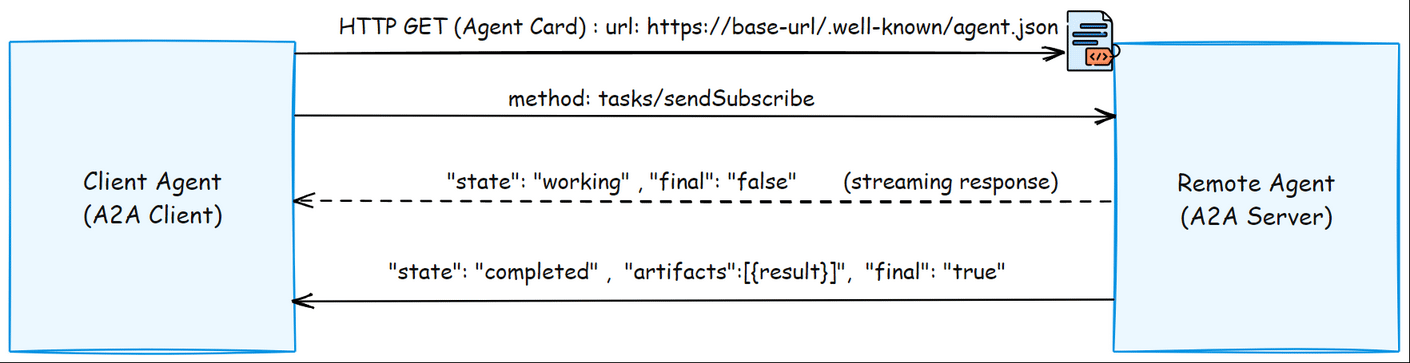
Streaming Task:
For streaming task, Client uses "tasks/sendSubscribe" to send a task to the remote agent. Remote Agent sends progress updates as live streaming.
We can see status updates like "working", with "final: false", It means this is not final and final response is yet to come. As the task continues, new artifact parts are appended to previous ones. Once everything is done, the Remote Agent sends a final event with status as completed, artifacts and "final: true" signaling this is the final response.
Sample JSON-RPC Exchange between Client and Server
Now we know that Remote Agents publish Agent Card in the specific URL.
Here is the sample Agent Card, you can see what it contains.
Send a Task
Below is the JSON‑RPC message exchange showing how the Client Agent sends a task to the Remote Agent using the "tasks/send" method.
"method":"tasks/send"– Method that tells the Remote Agent that the task is being sent.
message.parts.text– Field that contains task input from Client Agent.

Response from Remote Agent:
Once the task is complete, the Remote Agent sends a response like the one below.
"status.state":"completed"— showing the task has finished
"artifacts"— an array holding the final output.

Get a Task:
Below is the JSON‑RPC message exchange showing how the Client Agent fetches a task using the "tasks/get" method.
tasks/get– tells the Remote Agent to return the current task details.
params.id– the unique Task ID you want to look up.

Cancel a Task:
Client Agent uses the tasks/cancel method to cancel any task that is already submitted.

Remote Agent responds with the status as cancelled.

JSON-RPC Error Codes:
Below is the list of JSON-RPC error codes, which will be sent to Client Agent by server agent in case of any error.

Hope by now you would have got an idea about the message exchange between the Client Agent and Remote Agent.
Now let us compare A2A and MCP.
A2A vs MCP

Similarities
Both use HTTP as their transport layer.
Both support SSE (Server-Sent Events) for streaming responses.
Both leverage JSON-RPC structures for standardized communication
Differences
MCP connects agents with tools, APIs, and data sources where A2A enables agent-to-agent communication.
MCP uses structured data and function calls where A2A supports multi-modal communication through "parts".
A2A Multi‑Agent hands-on:
Let us now move from theory to practice by building a multi-agent system that uses A2A.
1. Clone the Repo and Prepare Your Environment
# Clone the repo
git clone https://github.com/google/A2A.git
cd A2A

# Create the virtual environment (named .venv) in the root dir
uv venv

# Activate the environment
.venv/bin/activate
2. Set Your API Key
Create a .env file in the root folder or set the environment variable directly. Remote Agents are configured to use Gemini API, so get your Gemini API Key, you will have free credits for initial usage.
# Create a simple .env file in this folder
# Remember to replace your API key in below command

echo GOOGLE_API_KEY=your_api_key_here > .env
3. Run the Client Agent
Before running the client, add a .env file in the demo/ui directory too. The Client Agent also needs a Gemini API Key. Client Agent is built with Google ADK.
# Get into the dir
cd A2A/demo/ui

# Create a simple .env file in this folder
# Remember to replace your API key in below command
echo GOOGLE_API_KEY=your_api_key_here > .env

# Run the client
uv run main.py
4. Run the Remote Agents
We have three remote agents. Remember to open a separate terminal for running each agent.
LangGraph’s Currency Agent
# Change into the LangGraph Currency Agent folder
cd A2A/samples/python/agents/langgraph

# Sync any new dependencies or updates
uv sync

# Launch the LangGraph Currency Agent
uv run .
CrewAI’s Image Generator Agent
# Change into the CrewAI Agent folder
cd A2A/samples/python/agents/crewai

# Sync any new dependencies or updates
uv sync

# Launch the CrewAI Agent
uv run .
Google ADK’s Expense Reimbursement Agent
# Change into the Google ADK Expense Reimbursement Agent folder
cd A2A/samples/python/agents/google_adk

# Sync any new dependencies or updates
uv sync

# Launch the Google ADK Expense Reimbursement Agent
uv run .
Client Agent and Remote Agents run on different ports. To connect them, add each Remote Agent's address (like- localhost:10000) to the Client Agent so it can find and use their Agent Cards.
5. Integrating Client and Remote Agents
a. Open the Web UI (Client Agent)
Access URL in which our Client Agent’s Web App is running http://localhost:12000
b. Tell the Client Agent About Your Remote Agents
We need to make the UI look for Agent Card of each Remote Agent by doing
Click the robot icon.
Hit the “add” button.
Enter your agent’s host (e.g.
localhost:10000— nohttp://).
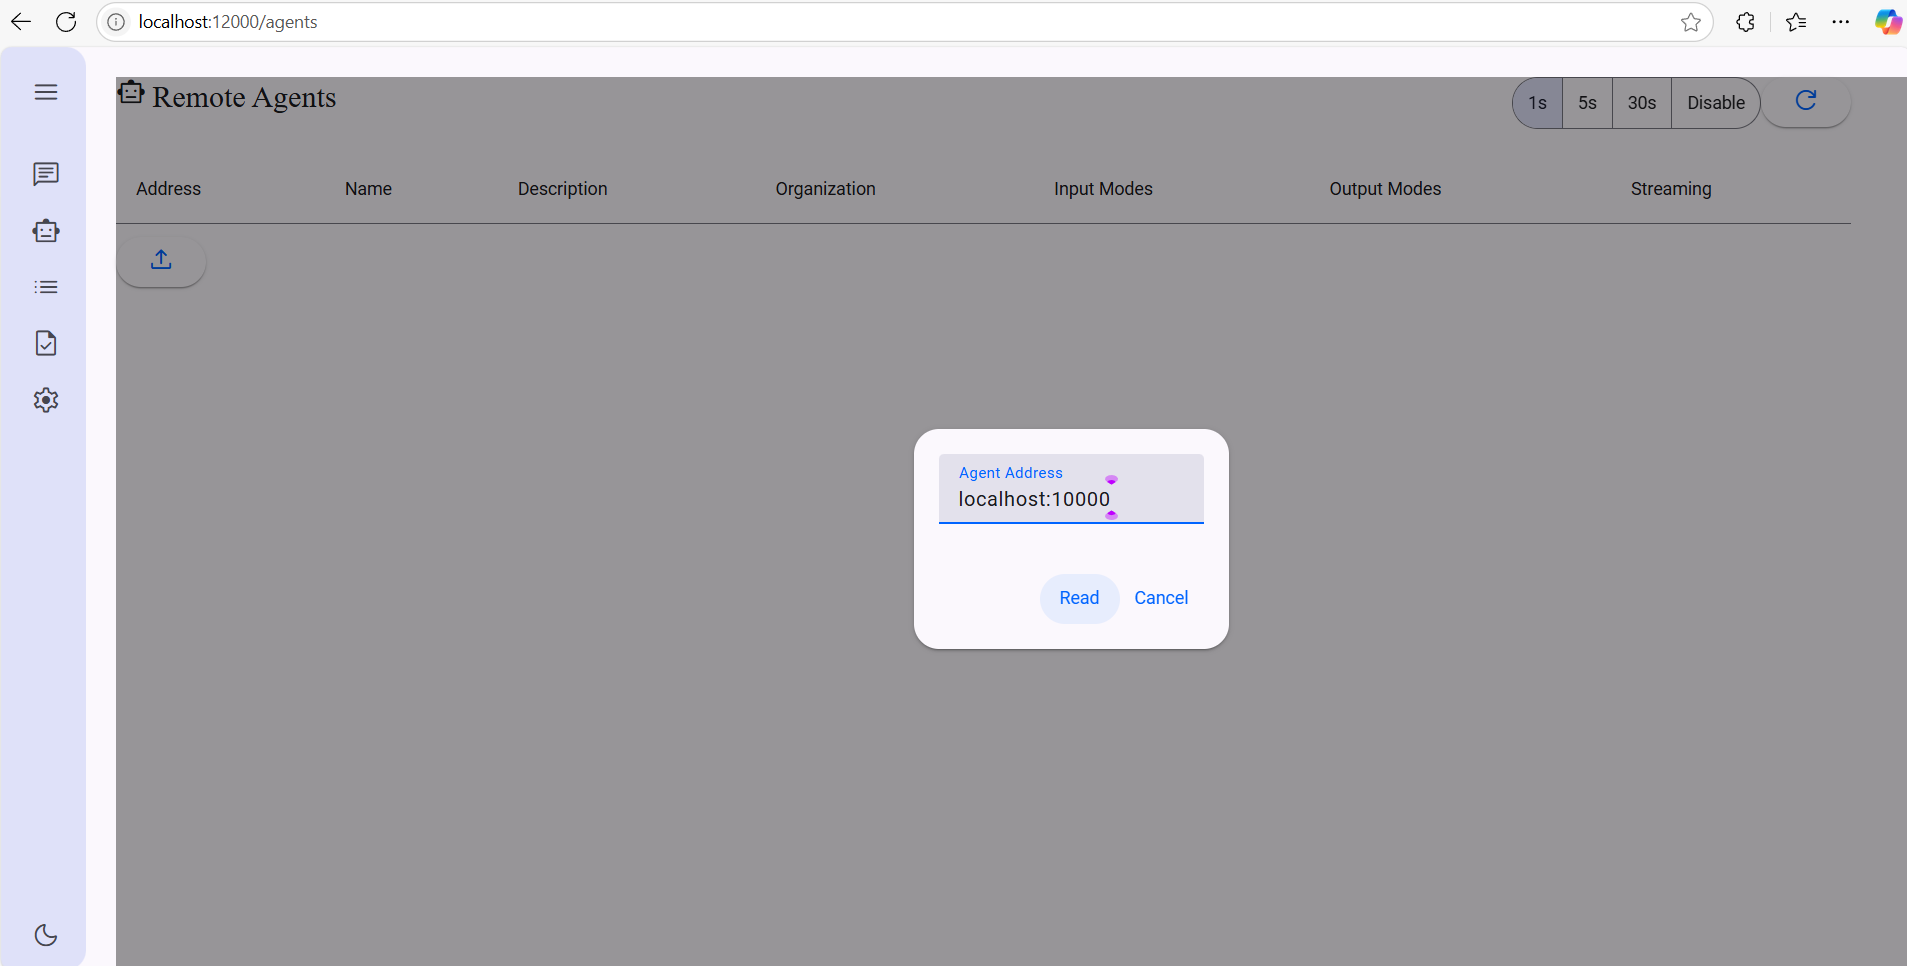
Click Read to fetch its Agent Card, then Save.
Once we click Read, the Client Agent sends an HTTP GET request to get the Remote Agent's Agent Card, which we can see in the Remote Agent's terminal.


Once it fetches the Agent Card, Click Save.
Repeat for other Remote Agents runing at
localhost:10001, andlocalhost:10002.

Once you added all the agents, now it is time to start the conversation and test the agents.
6. Test the Agents
Click the message icon, then the “+” to open a new chat.
Type your question and press Enter. The Client Agent (UI) will look at all registered Agent Cards, pick the right agent, and send your prompt over A2A.
The client Agent is capable of identifying the right Remote Agent and Send the task to that.

See further conversation

Once the form has been submitted the Agent provides further updates.

Below is a screenshot of A2A in action. See the Reimbursement Agent’s system instruction at the top, and the highlighted section shows the key "parts" exchanges that drive the form workflow.

Now check the console’s Event List as well, we can spot an “input-required” status when the Remote Agent is paused waiting for our reply. As soon as we send the missing details, it picks up and finishes the request.

The Future of MCP + A2A
A recent GitHub discussion raises interesting questions about how MCP and A2A might work together:
Agent Cards as MCP Resources: Could MCP servers host each agent's agent card, making it easier for MCP clients to find available agents?
A2A Operations as MCP Tools: Could basic A2A methods like "
tasks/send"be wrapped as MCP tools? This would let an MCP client both find an agent and use its A2A features directly.
Beyond these discussions, I wonder, Is A2A's state management system truly separate from what MCP can offer, or could these two protocols eventually merge some capabilities?
As developers experiment with both protocols, we will see which approach works best. What do you think?
Can MCP handle everything A2A does, or do we really need both?
Or does agent collaboration really need its own protocol?
Conclusion
We have discussed about A2A, the JSON specification in A2A, how it works, and even the live demonstration.
It's clear that we are heading towards Multi-Agent Systems. Just as MCP is being adopted widely, it is now time to experiment and adopt A2A alongside MCP. Let us build more using A2A+MCP, identify the blockers, and work to solve them as we build a truly autonomous AI ecosystem.
Happy building!
🚀 I'm excited to share that I'm building a2adirectory.co — a public registry for A2A-compliant agents. The platform will feature agent discovery, schema validation, capability filtering, and trust indicators. Inspired by the interoperability vision outlined in this article, my goal is to make it easier for developers to find, evaluate, and integrate agents across frameworks like LangChain, CrewAI, and Google's ADK. If you're building an agent or interested in contributing, feel free to reach out!