

AI Editors introduced vibe coding, so building websites and apps are no longer a challenge. Cursor is one of these AI editors, and most developers use it nowadays. But not everyone uses it effectively.
I have been using Cursor for a long time. I can tell you that, if you use the right tactics, you can write better code and code faster, just like an experienced developer. Cursor Rules help you get the most out of Cursor. Without rules, Cursor gives you generic code. With rules, it gives you code that actually fits your project standards.
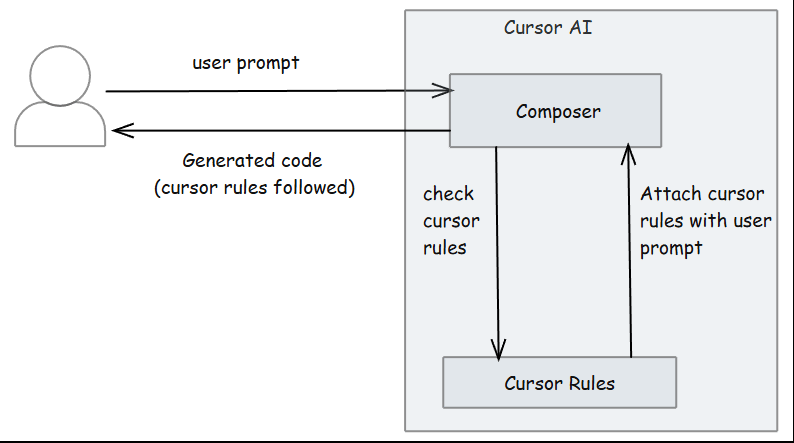
So, what are cursor rules exactly? They're instructions that tell Cursor AI how to write code in your specific project.
In this blog, we're going to explore more on cursor rules.
We will cover:
What are cursor rules
Types of cursor rules
How to create cursor rules
Rule inheritance
Testing cursor with and without rules
Tips for better cursor rules
Pre-built rules ( cursor.directory, awesome-cursorrules, cursor-rules CLI)
Use rules to manage memory in cursor- A Developer Technique
At the end of this blog, you’ll know what Cursor Rules are, how to use them, where to find good ready-made rules from the community, and how to create your own rules. You’ll have all the basics, tips, and resources to set up rules that make coding faster and better in Cursor.
What are Cursor Rules
Cursor Rules are simple files. You create them and they sit in your project folder. Cursor reads this file automatically and follows the instructions you write inside. These rules tell Cursor AI how to behave in your project, so, your generated code stays consistent with your instructions.
Types of Cursor Rules
Cursor supports three types of rules
Project Rules
User Rules
.cursorrules(legacy)
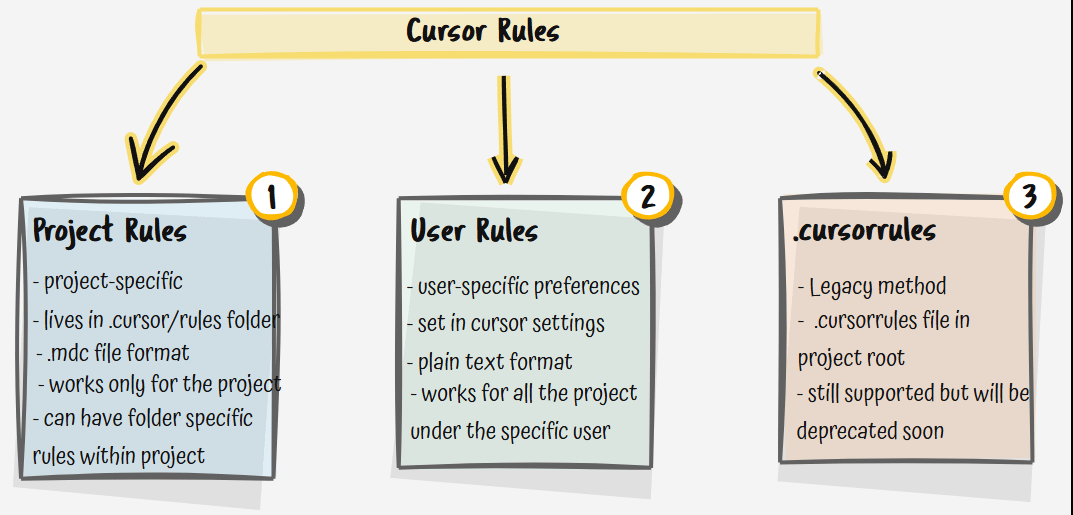
Project Rules
These rules live in your project folder. You put them in .cursor/rules directory. They only work for that specific project.
File type of Project Rule is .mdc.
Subdirectories can have their own .cursor/rules directory, specific to that folder.

You can add these in your Project Rule file:
Write about your project, so the AI knows the context.
Add instructions or template code to follow your standards.
Set coding style and architecture to keep everything consistent.
Example Project Rule:
---
description: React component creation
globs: ["**/components/**", "**/pages/**"]
alwaysApply: false
---

- Use functional components with TypeScript
- Always define props interface above component
- Include default export at bottom
- Add JSDoc comments for complex props

@component-template.tsxglobs- This has file paths. Rules apply to files in these paths only.alwaysApply- Whether to include rule in every AI request or only when working on files that match the globs patterns.@component-template.tsx- If you include anything with @, then that file will be used as an additional context.
You can create this Project Rules using either the UI or the command line.
We’ll cover both methods in the upcoming section.
User Rules
These rules are user-specific rules. Once you set them up in Cursor Settings, they apply to every project you work on.
User rules do not support. mdc format. They are plain text only.
User rules are good for personal preferences.
Example User Rules,

.cursorrules (Legacy Method)
This is the old way of setting up Cursor rules. You create a .cursorrules, a file in your project root. Write your instructions inside this file. Cursor reads it automatically. No setup required.
Most tutorials online still show this method. But Cursor recommends Project Rules instead.
Snippet of .cursorrules,
You are an expert in TypeScript, Node.js, Next.js App Router, React, Shadcn UI, Radix UI and Tailwind.

  Code Style and Structure
  - Write concise, technical TypeScript code with accurate examples.
  - Use functional and declarative programming patterns; avoid classes.
  - Prefer iteration and modularization over code duplication.
  - Use descriptive variable names with auxiliary verbs (e.g., isLoading, hasError).
  - Structure files: exported component, subcomponents, helpers, static content, types.

  Naming Conventions
  - Use lowercase with dashes for directories (e.g., components/auth-wizard).
  - Favor named exports for components.   etc....
Project Rules Vs .cursorrules
The new Project Rules system gives you more control. You can have multiple rule files. You can target specific folders. You can reference template files.
With .cursorrules, everything goes in one file.
If you already have a .cursorrules file, it will keep working. But consider migrating to the new Project Rules method (.mdc format).
Which Type Should You Use?
For project-specific stuff, use Project Rules.
For personal preferences that apply everywhere, use User Rules.
Skip the legacy
.cursorrulesfile as this will be deprecated soon.
How to create cursor rules
There are two ways you can create cursor rules,
Go to the cursor settings, look for Rules,
For Project Rules:
Click Add Rule near Project Rules. This will create the
rule.mdcfile inside.cursor/rulesfolder, where you can type your own instruction.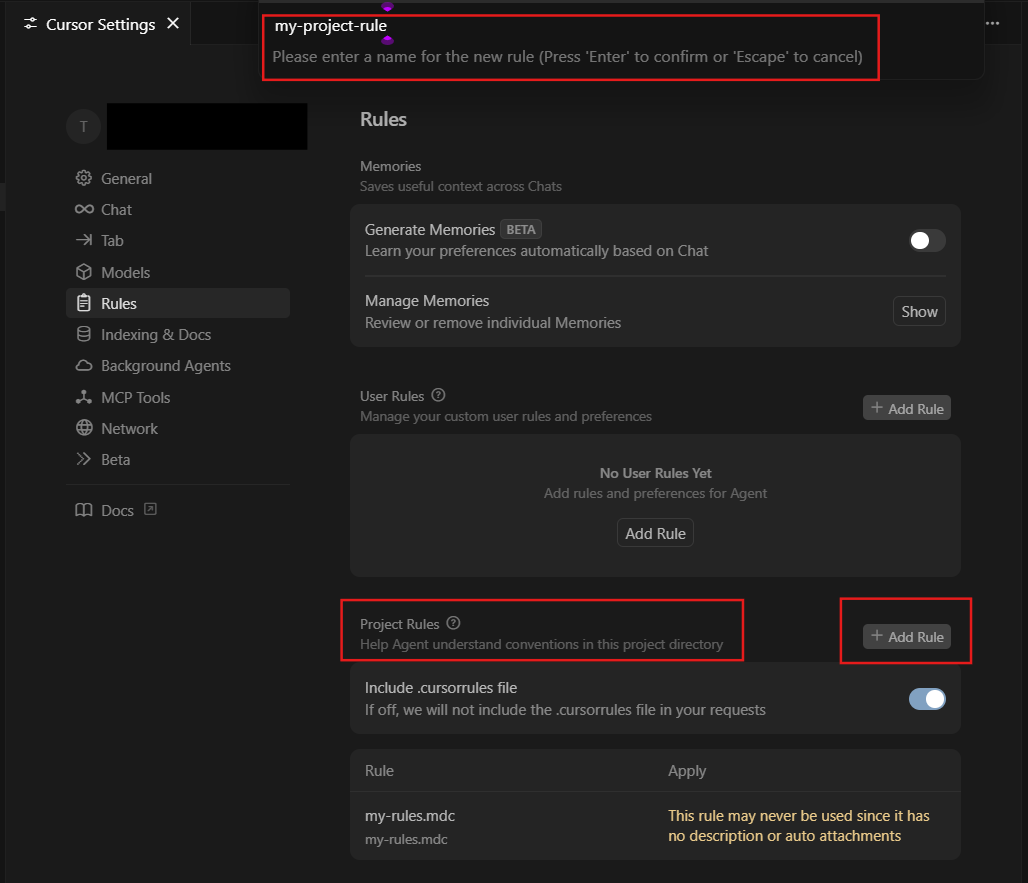
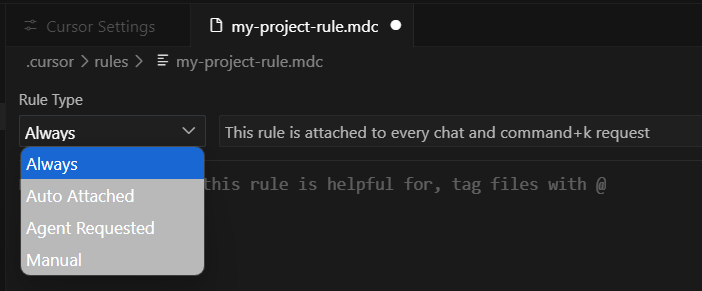
Project Rules have different options available. Pick the right one for your project and add your rules.

For User Rules:
You can click Add Rule near User Rules and add your instructions.

Another way to create rules is through the composer chat. Type
/and select "Generate Cursor Rules". This creates rules based on your current conversation with Cursor.


Rule Inheritance
Many developers aren’t aware that Cursor Rules support inheritance.
Just like classes in programming, you can create a base rule and reference it in other rules.
Start with a base rule that includes your main instructions. Then, reference this base rule in your other rules to add or override details as needed. This keeps your rules organized and easy to manage.
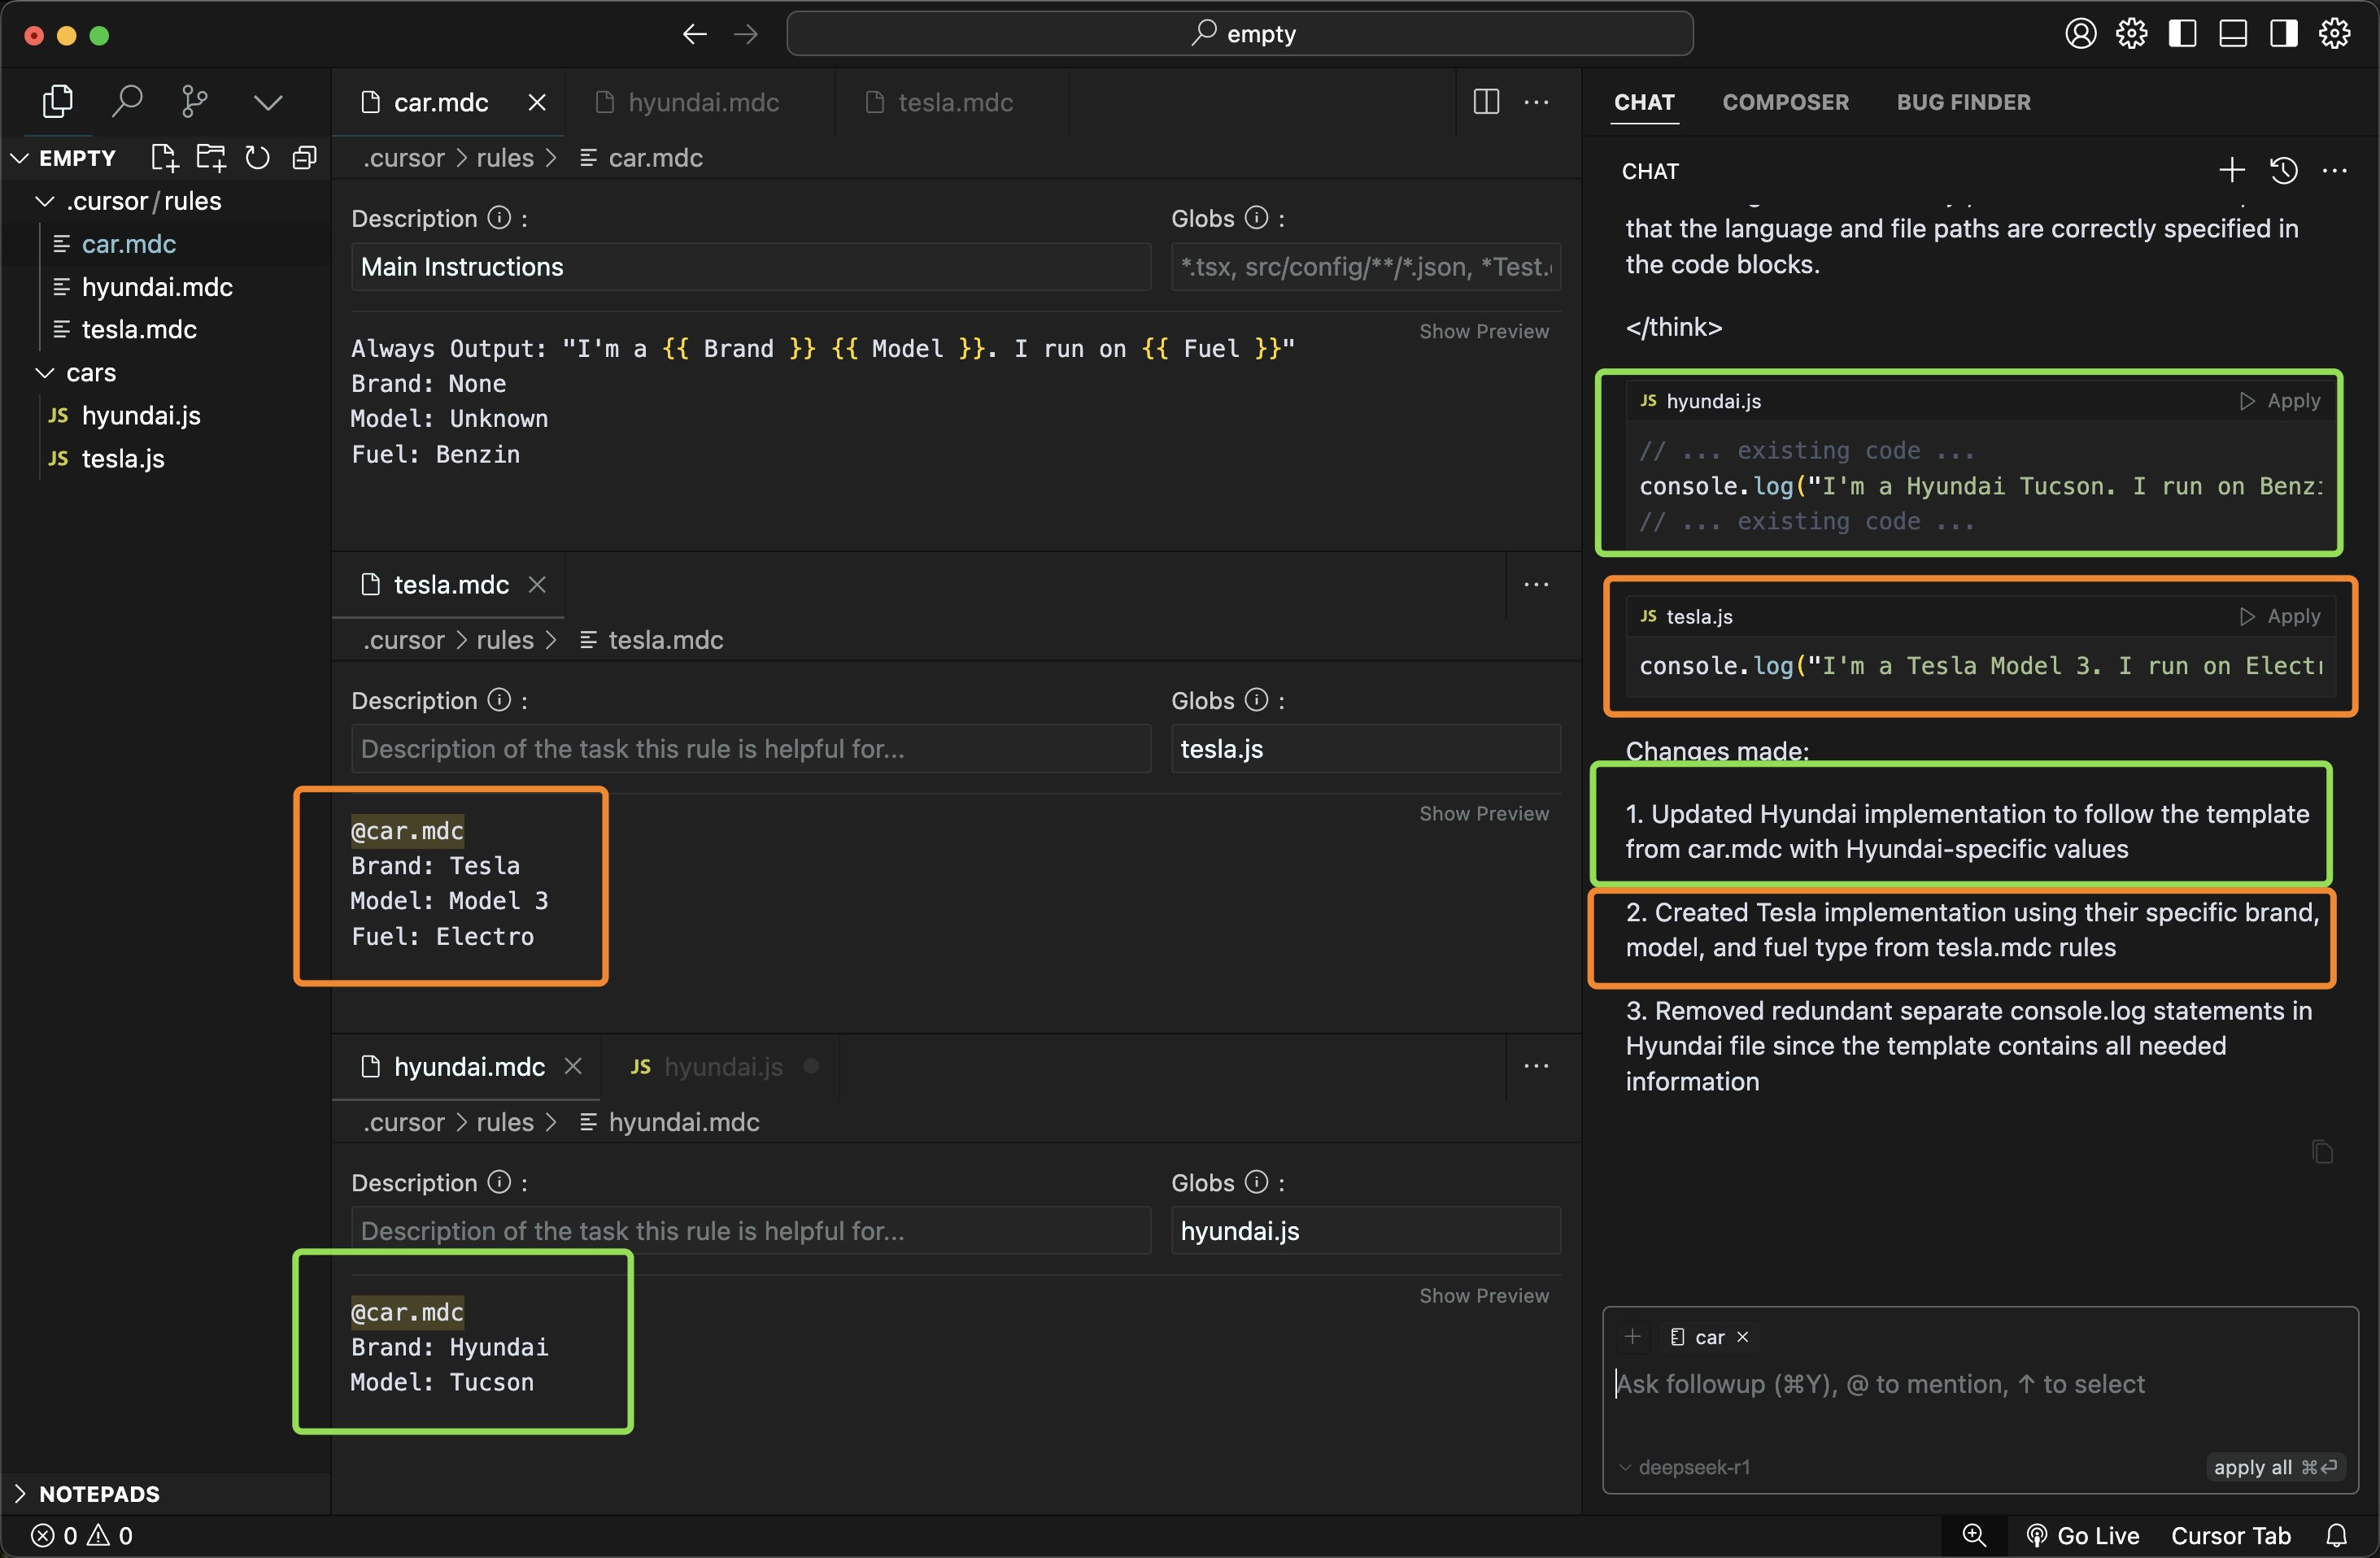
The screenshot above shows inheritance working perfectly. Notice how:
car.mdcacts as the base template with common structuretesla.mdcreferences@car.mdcand adds Tesla-specific details (Model 3, Electro fuel)hyundai.mdcreferences@car.mdcand adds Hyundai-specific details (Hyundai, Tucson)
When Cursor generates code, it combines the base template with specific overrides. You can see this in the chat panel where it created proper implementations for both Tesla and Hyundai following the same base pattern.
This approach scales well for large projects. Common patterns stay in one place. Specific variations get their own rules. Your code stays consistent across the entire project.
Testing Cursor with and without Rules
I tested cursor by building the same project with and without rules.
Here is what I asked: "Build a sample dashboard with Next.js and Supabase authentication"
Without the rule, the code followed older patterns that work for basic cases but lack production-ready features. With the rule, Cursor generated modern, SSR-compatible code following current best practices.

The rule made a significant difference in code quality and approach.
Modern SSR-compatible packages instead of basic client-only setup.
Better project structure with organized route groups.
More descriptive naming conventions.
Proper separation between auth and protected routes.
Tips for creating best cursor rules
Start with Project Overview
Write one or two sentences about your project. What does it do? What type of application is it?
This is an e-commerce web app built with React and TypeScript.
It handles online shopping, payment processing, and inventory management.
Use modern React patterns with functional components and hooks.
Mention your coding standards
List the style rules your team follows. Be specific about naming and formatting.
Code Style Guidelines:

- Use camelCase for variables: `const userName = 'john'`
- Use PascalCase for components: `const UserProfile = () => {}`
- Always use semicolons and trailing commas
- Prefer const over let, never use var
- Use template literals for string interpolation: `Hello ${name}`
Specify your tech stack
Tell Cursor which libraries and frameworks to suggest. Include the main ones you use daily.
Tech Stack:

- Frontend: React 18, TypeScript, Tailwind CSS
- Backend: Node.js, Express, Prisma ORM
- Database: PostgreSQL
- State Management: Zustand
- Testing: Jest, React Testing Library
Always import React components like: import { useState } from 'react'
Explain your folder structure
Show Cursor where different types of files go. This helps with imports and organization.
File Organization:

- src/components/ui/ - Reusable UI components
- src/components/features/ - Feature-specific components
- src/hooks/ - Custom React hooks
- src/utils/ - Helper functions
- src/services/ - API calls and external integrations
- src/types/ - TypeScript type definitions

Import pattern: import { Button } from '@/components/ui/button'
Add performance guidelines
Include rules that keep your app fast. Mention specific techniques you want used.
Performance Rules:

- Use React.memo for components that receive stable props
- Implement lazy loading: const LazyComponent = lazy(() => import('./Component'))
- Optimize images with next/image component
- Use useMemo for expensive calculations:
  const expensiveValue = useMemo(() => heavyCalculation(data), [data])
- Avoid inline objects in JSX: define outside component or use useMemo
Define your testing approach
Explain how you write tests. Which tools to use and what to test.
Testing Standards:

- Write unit tests for all utility functions
- Test components with React Testing Library:
  render(<Component />)
  expect(screen.getByText('Hello')).toBeInTheDocument()
- Use data-testid for complex selectors: <button data-testid="submit-btn">
- Mock API calls with MSW (Mock Service Worker)
- Aim for 80% coverage on business logic, focus on critical paths
Set documentation rules
Tell Cursor how much documentation you want. When to add comments and what style to use.
Documentation Guidelines:

- Use JSDoc for all exported functions:
  /**
   * Calculates user discount based on membership tier
   * @param user - User object with membership info
   * @param amount - Purchase amount in cents
   * @returns Discount percentage (0-100)
   */

- Add inline comments for complex business logic
- Include README.md in each major feature directory
- Use TypeScript interfaces for API responses:
  interface ApiResponse<T> { data: T; status: number; message: string }
Include error handling patterns
Show how you want errors managed. Consistent patterns make debugging easier.
Error Handling Patterns:

- Wrap async operations in try-catch:
  try {
    const data = await fetchUser(id)
    return data
  } catch (error) {
    logger.error('Failed to fetch user', { userId: id, error })
    throw new UserFetchError('Unable to load user data')
  }

- Use React Error Boundaries for component errors
- Create custom error classes: class ValidationError extends Error {}
- Log errors to monitoring service (Sentry/LogRocket)
- Always provide user-friendly error messages in UI
Use Pre-built Rules
You don’t have to write rules from scratch every time.
Cursor.directory has pre-built rules for different programming languages and frameworks.
You can find rules for Python, TypeScript, React, Next.js, and many more. Just copy the ones you need and paste and edit them for your project.
These community-created rules save you time. They include best practices and common patterns for each technology stack.

Another great resource is the awesome-cursorrules GitHub repository. It has curated collection of .cursorrules and .mdc files for different technologies. You’ll find community-shared rules for frontend, backend, and even mobile projects. These can be copied into your project and used as project rules.

Add Rules to Your Project with cursor-rules CLI
If you want to save more time, you can use the cursor-rules-CLI.
This tool scans your project, figures out what libraries you’re using, and downloads the matching .mdc rule files directly from awesome-cursorrules.
It puts them in your .cursor/rules folder, so Cursor can use them right away.
Run a single command, and your. cursor/rules folder is set up automatically.
pip install cursor-rules

cursor-rules
You can see below how it works,

You can see the rules created under .cursor/rules.

This cursor-rules CLI is useful when you want to set up rules quickly.
Use Cursor Rules to maintain memory: A Developer Technique
We can use Cursor Rules to create memory that lasts throughout our project.
Create a Project Rule (rule.mdc) with the instruction below. Check the complete rule instruction here.
## MANDATORY FIRST ACTION

Before responding to ANY request, you MUST:

1. Check if ".remember/memory/self.md" exists
2. Check if ".remember/memory/project.md" exists

3. If they don't exist, CREATE them
4. If they exist, READ them and apply learned knowledge

Ensure Cursor avoids repeating known mistakes by persistently logging corrections and learning. All requests must reference stored knowledge in:
- ".remember/memory/self.md" — for known mistakes and their fixes
- ".remember/memory/project.md" — for user preferences and custom rules
We add a rule that tells Cursor to log preferences and changes in a file, and to refer to these updates every time. So, the memory stays for the whole project.
Now with this rule attached, let's see how it works in practice. I asked Cursor to build a dashboard with my specific preferences.
Watch what happens:
Cursor automatically stores my preferences in project.md
It remembers every choice I make in real-time
The memory files get updated as I work
Here's the first test in action:

When you change your preferences, the memory system (project.md) is updated right away. Because that's what the rule tells Cursor to do.
For example, when I said, "I prefer npm over yarn, and I want to use CSS Modules instead of Tailwind."
Cursor immediately updates the project.md file with my corrected preferences. You can see it changing from yarn to npm and from Tailwind to CSS Modules.
And this memory file will be checked every time, so your preferences are always followed.

This rule-based memory technique works really well in real-time. It stores all your project preferences and updates in files. You can share these files with other developers on your team.
This creates a shared memory system. No need to train Cursor again for each developer.
Conclusion
We covered different types of rules and how to set them up. We also saw tips for best rules, some samples and a developer technique for maintaining memory in the project too.
Always keep personal preferences in User Rules and project-specific guidelines in Project Rules. Try different rules and identify which one works for you.
It's obvious that with rules, Cursor does the job a lot better. So, try it now.
Happy learning!