

We keep hearing about Harness Engineering. But many of us do not know what Harness actually is. We know that a good model alone can not make a good agent. The setup around the model is important.
In this blog, let us see about Harness, DeepSeek Harness, and how to create our own plugin for DeepSeek Harness.
What is Harness
The LLM API call is a part of an agent. We still need to provide context, expose tools, maintain memory, manage permissions, plan the steps, write retry loops, error handling, and output validation. All of them together is called a Harness.
So, a good harness makes a good agent.
I have read some articles about Harness Engineering. Attaching a few of them here for more details.
Here is a video explaining what Harness is.
Now, let us see about DeepSeek Harness.
DeepSeek Harness
DeepSeek AI has released DeepSeek Harness, an open-source agent harness. The interesting part is its architecture. It treats everything as a plugin. Those plugins can be loaded, unloaded dynamically. Let us see how it works, how to set it up, and how to create our own plugin.
Why Everything is a Plugin
How DeepSeek Harness Works
How to Set Up and Use DeepSeek Harness
How to Create Our Own Plugin
1. Why Everything is a Plugin
DeepSeek Harness uses Cordis as the underlying framework. Cordis manages plugins, their dependencies, and the changes they make to the application.
Cordis provides a shared context for all the plugins. A plugin can add a service, listen to an event, or add some behaviour to the agent. When we remove the plugin, the changes added by that plugin are also removed. This is how DeepSeek Harness can load, unload, and replace plugins dynamically.
For example - Even the Web UI is built as a plugin. For example, the sidebar is a plugin. We can disable it from the configuration, reload the Web UI, and the sidebar will be removed. We can enable it again without making any changes to the core application.
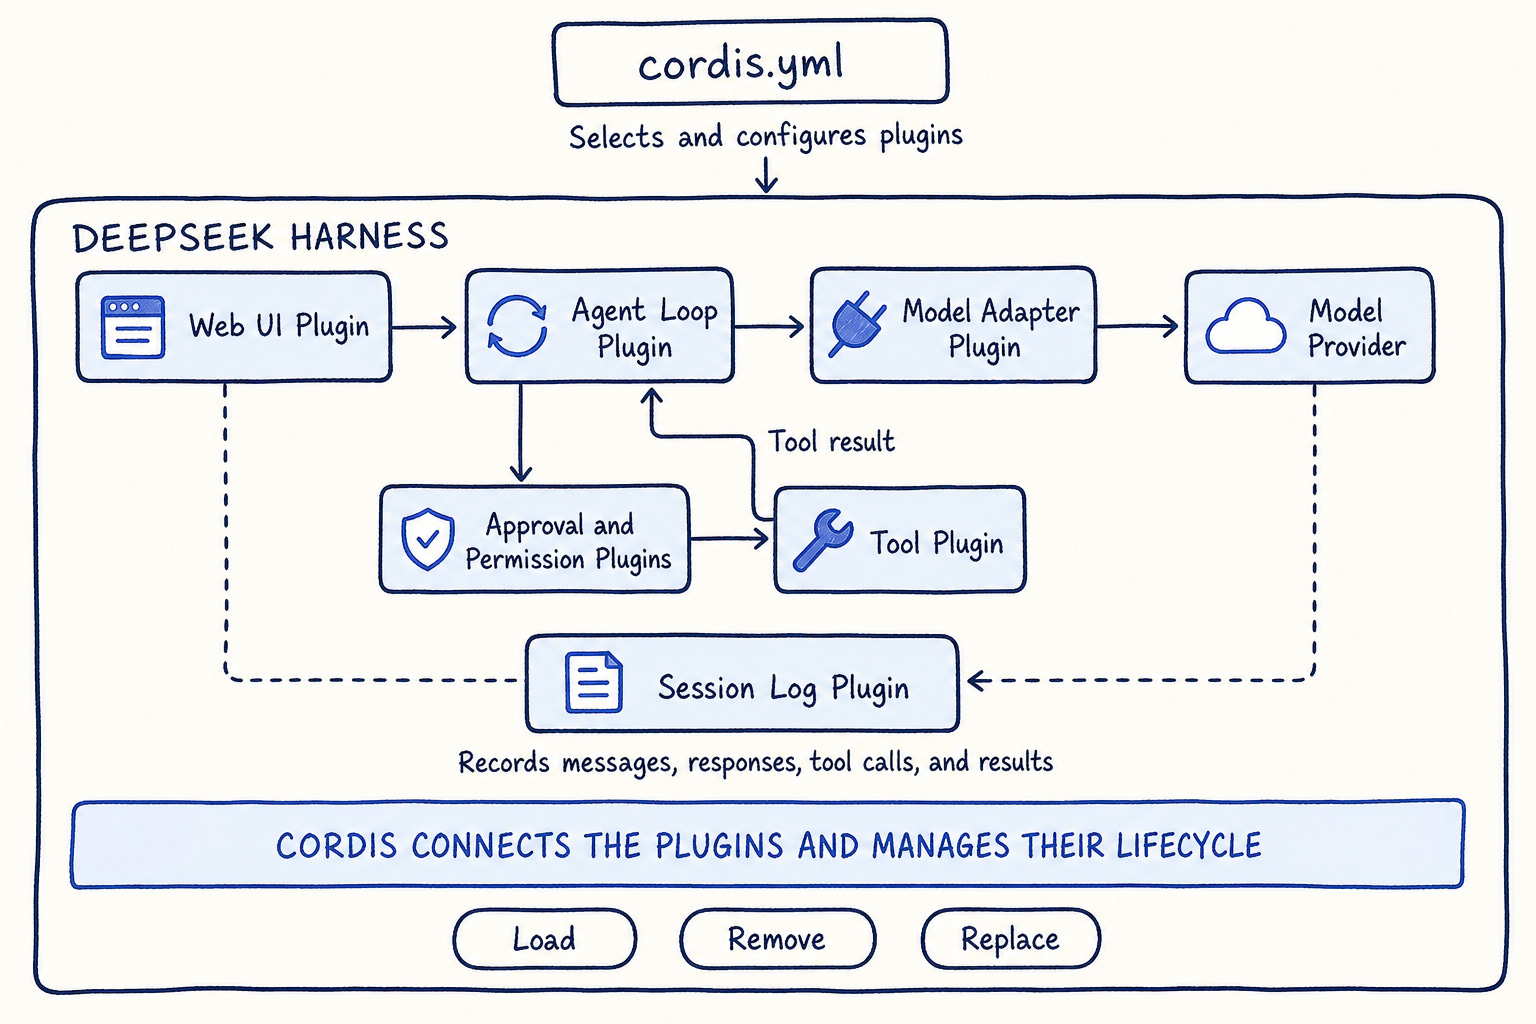
Lets now see how it works
2. How DeepSeek Harness works
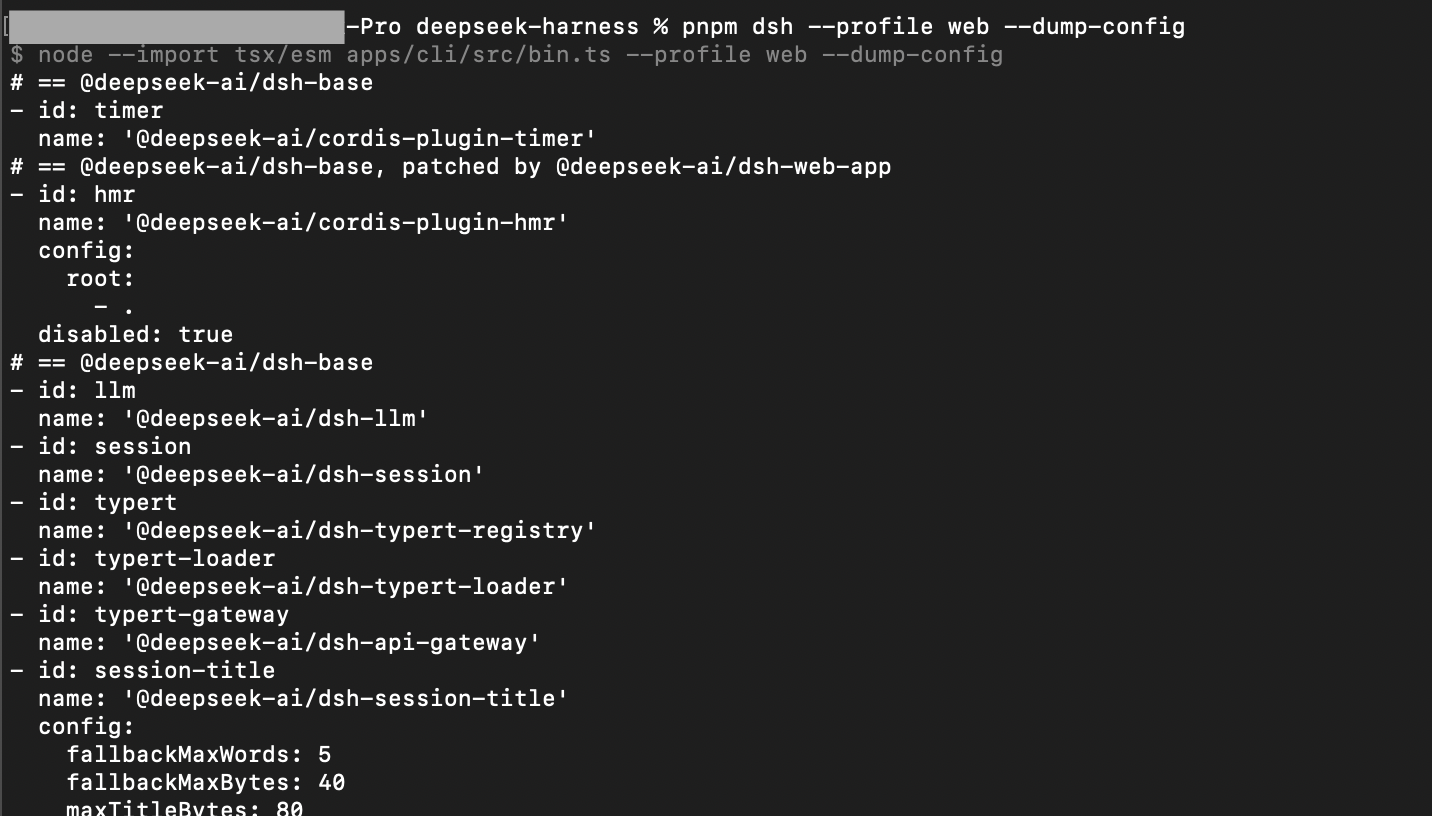
When we start DeepSeek Harness, it loads a profile. The profile decides which bundles and plugins should be loaded.
DeepSeek Harness has two main profiles:
web profile starts with the Web UI.
Theheadless profile runs it from the terminal without the Web UI.
Each profile brings a set of related plugins. For example, the Web one loads the plugins needed for the Web UI. This way, DeepSeek Harness loads only the parts required for the selected profile.
Once the profile is loaded, we can start a session and send a message.
Here is how the message flows inside harness.
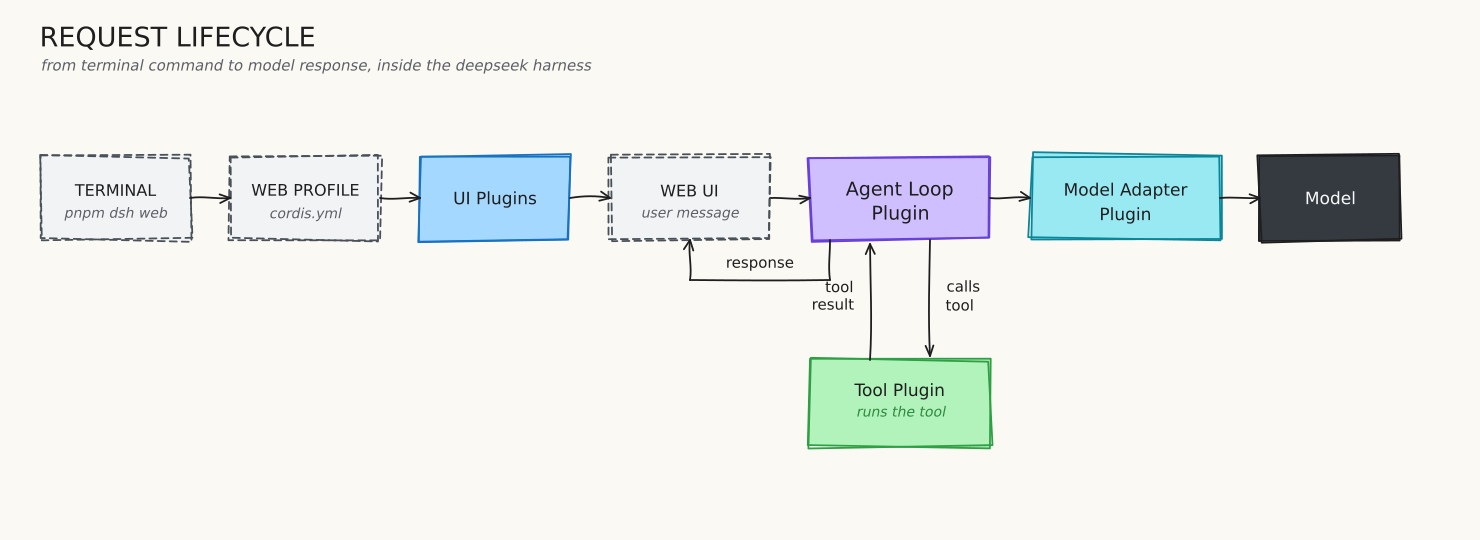
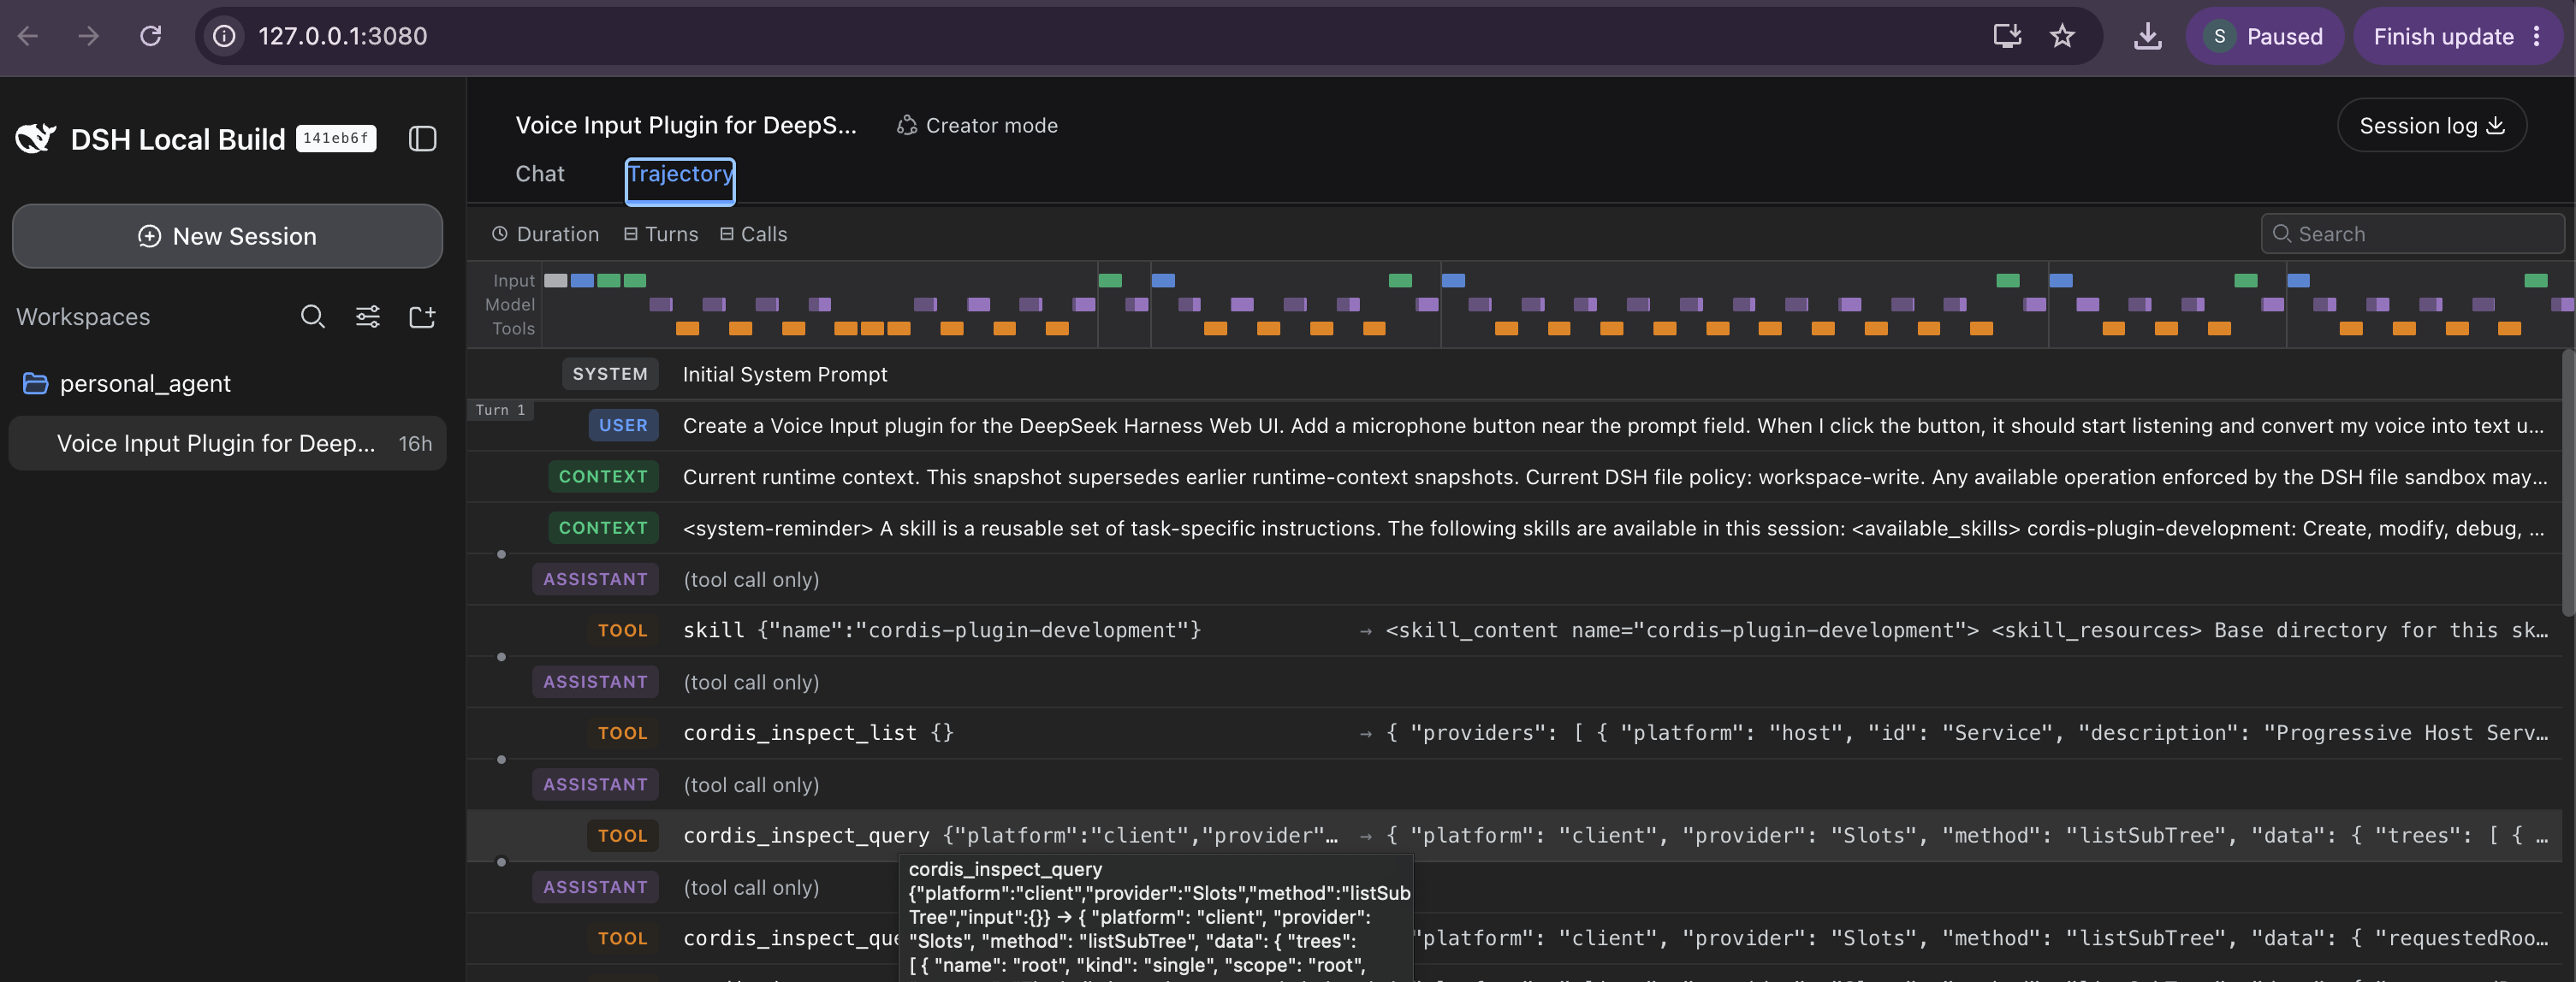
We can see all these details inside the Trajectory tab. It shows steps, tool calls, and results returned to the model.
3. How to Set Up and use DeepSeek Harness
We need Node.js to run DeepSeek Harness. Once Node.js is installed, run this command
npx @deepseek-ai/dsh webBut above command did not work properly for me. So, I cloned the repository and ran it from the source.
git clone https://github.com/deepseek-ai/deepseek-harness.git
cd deepseek-harness
pnpm install
pnpm run build
pnpm dsh web
pnpm dsh web - will open the web UI in the browser at http://localhost:3080
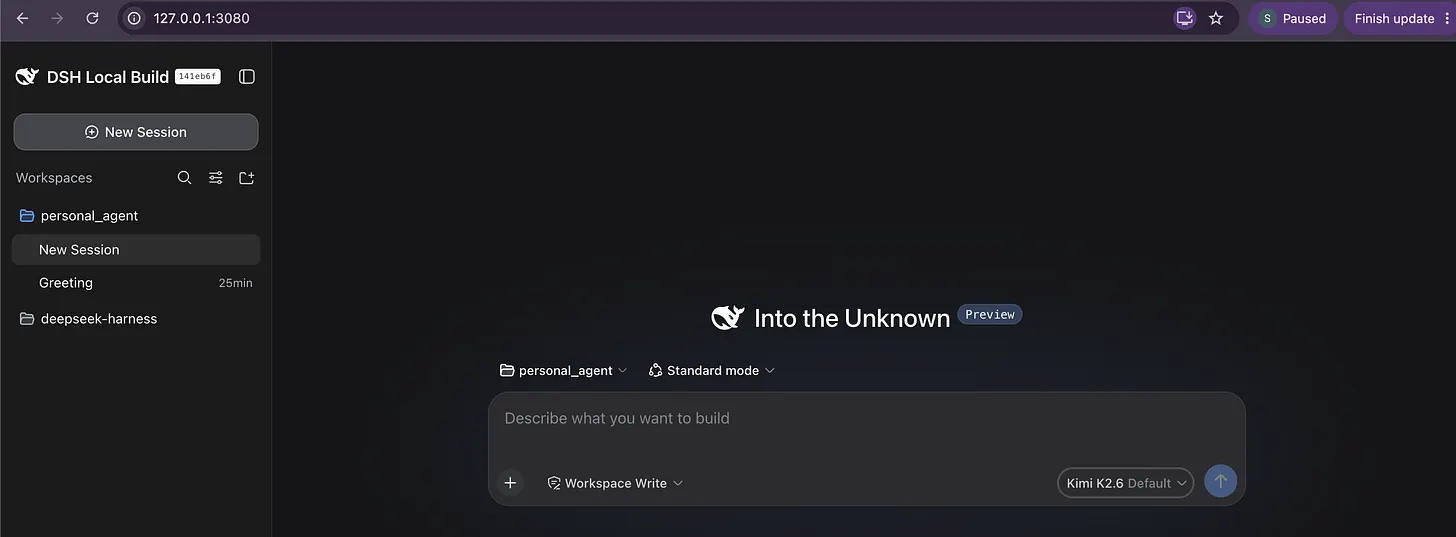
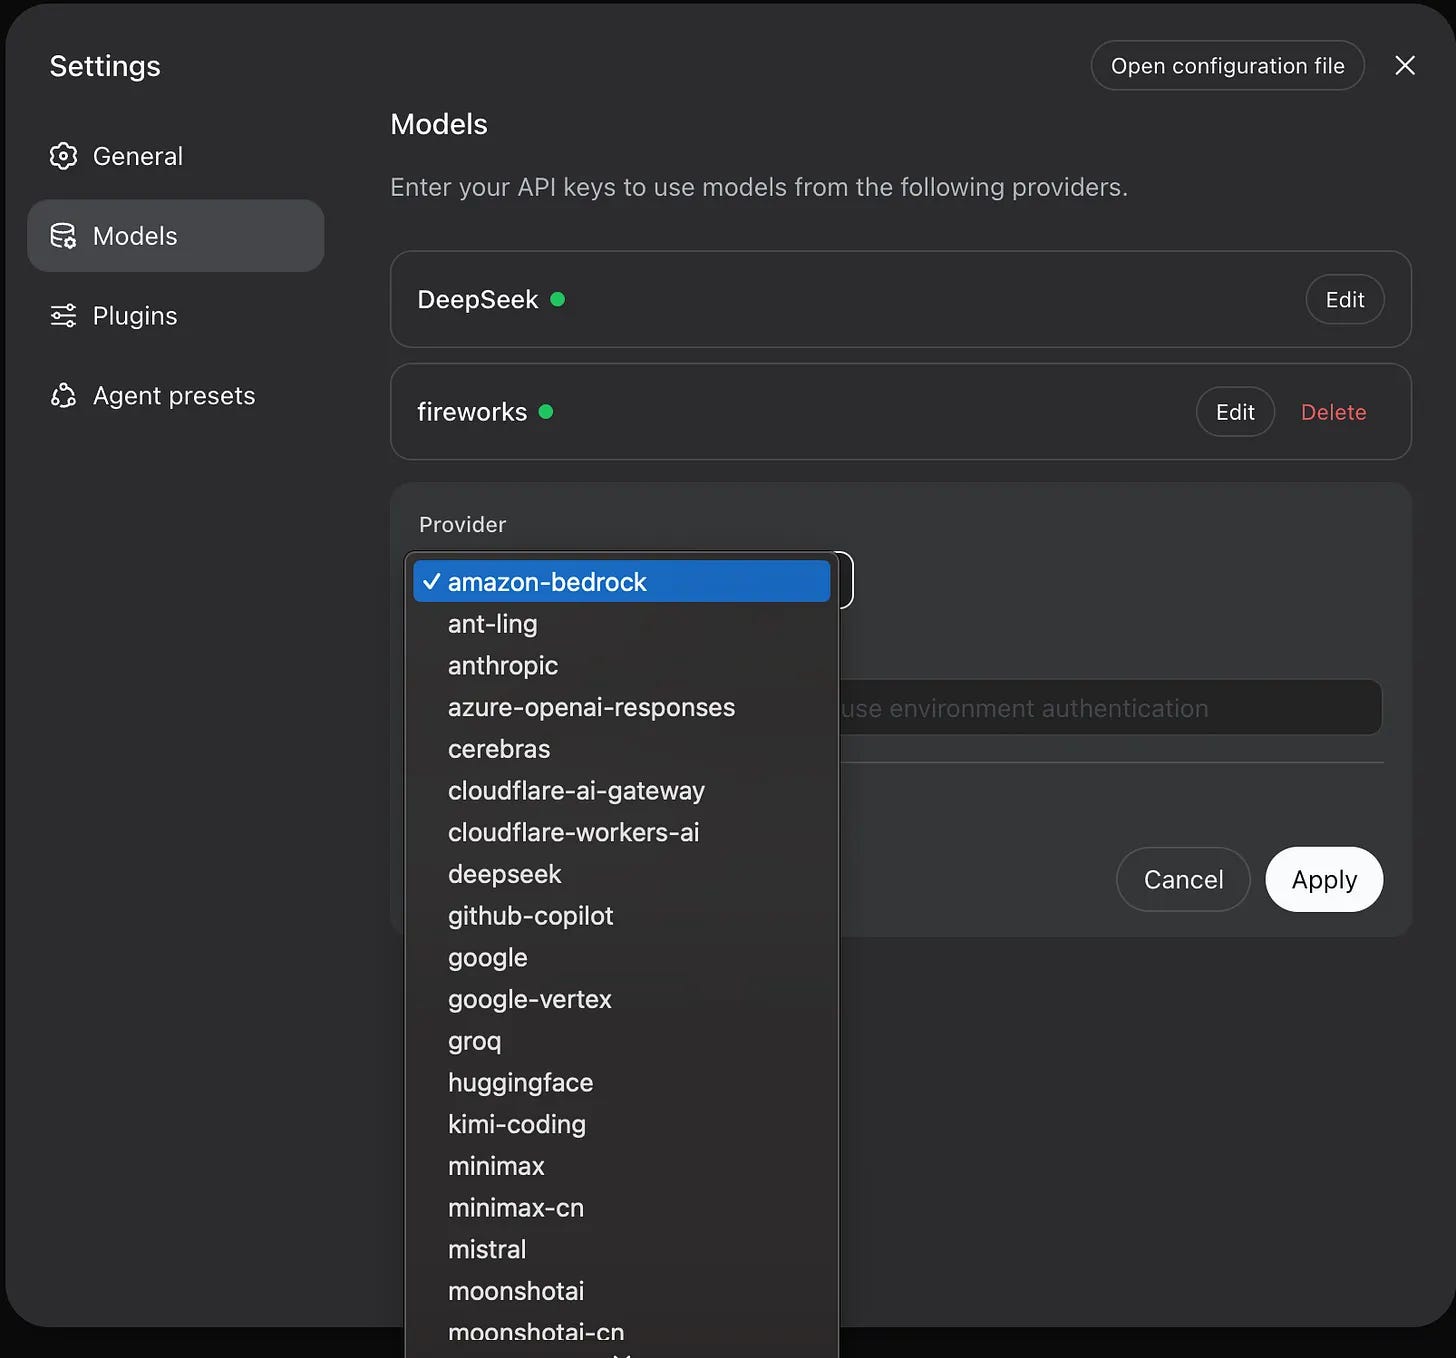
Now we can plugin the model we want. Go to settings and change the model.
Check Plugins tab, and you can see loaded plugins.
4. How to Create Our Own Plugin
We can create plugins in two ways.
Create plugin Manually ( by writing plugin code )
Use Creator Mode in the Web UI and ask the agent to create it for us.
Creator Mode will create the plugin and load it into the current session. We do not need to do any coding.
Creating voice mode as a plugin- Creator Mode
For example, there is no voice input option in the DeepSeek Harness Web UI. So, let us ask Creator Mode to add a microphone button near the prompt field. The voice should be converted into text and added to the prompt field. We should also be able to edit the text before sending it.
Step 1: Open a Web session and select Creator Mode. I gave this prompt.
There is no voice input in the Web UI. Can you add it as a plugin?

Add a microphone icon near the prompt box. When I click it and speak, the voice should come as text in the prompt box. Do not send it directly. Let me check and edit the text before sending.
It started creating the plugin. Once done, it loaded the plugin into the session. You can check the video below to see how the plugin was created and loaded.
Creating voice mode as a plugin- Manual Mode
Now, we will create the same Voice Input plugin by writing the code. You can refer docs for creating your own plugin.
Inside the cloned DeepSeek Harness repository, I created a folder named voice-input-plugin. It contains four files. The folder structure is,
deepseek-harness
├── apps
├── packages
├── voice-input-plugin
│   ├── package.json
│   ├── index.js
│   ├── client.js
│   └── cordis.patch.yml
└── package.json
We can store a plugin anywhere, but i just keep it inside the repository.
In DeepSeek Harness, a plugin is a module with an apply function. Cordis calls this function while loading the plugin and provides the ctx context object.
For our Voice Input plugin, the core part looks like this. Its in client.js
function apply(ctx) {
  ctx.slots.inject('conversation.input.right', () =>
    ctx.slots.register(
      {
        name: 'conversation.input.right',
        id: 'voice-input',
      },
      VoiceInputButton,
    ),
  )
}

module.exports.name = 'voice-input-plugin'
module.exports.inject = ['slots', 'sessions']
module.exports.apply = apply
Here, the plugin uses the conversation.input.right slot to add the microphone button near the prompt field. The VoiceInputButton handles microphone access and converts the voice into text using the browser Speech Recognition API.
The index.js file is only the main plugin entry:
export const name = 'voice-input-plugin'

export function apply() {}
Next, we need to tell DeepSeek Harness to load this plugin. For that, create a cordis.patch.yml file inside the voice-input-plugin folder.
- insert:
    - id: manual-voice-input
      name: dsh-manual-voice-input-plugin
dsh plugin --profile web add /absolute/path/to/voice-input-pluginAnd you can see the cordis.patch.yml under web now has the plugin entry.

Now run,
pnpm dsh webSee the voice mode plugin created , using creator mode as well as manual mode.
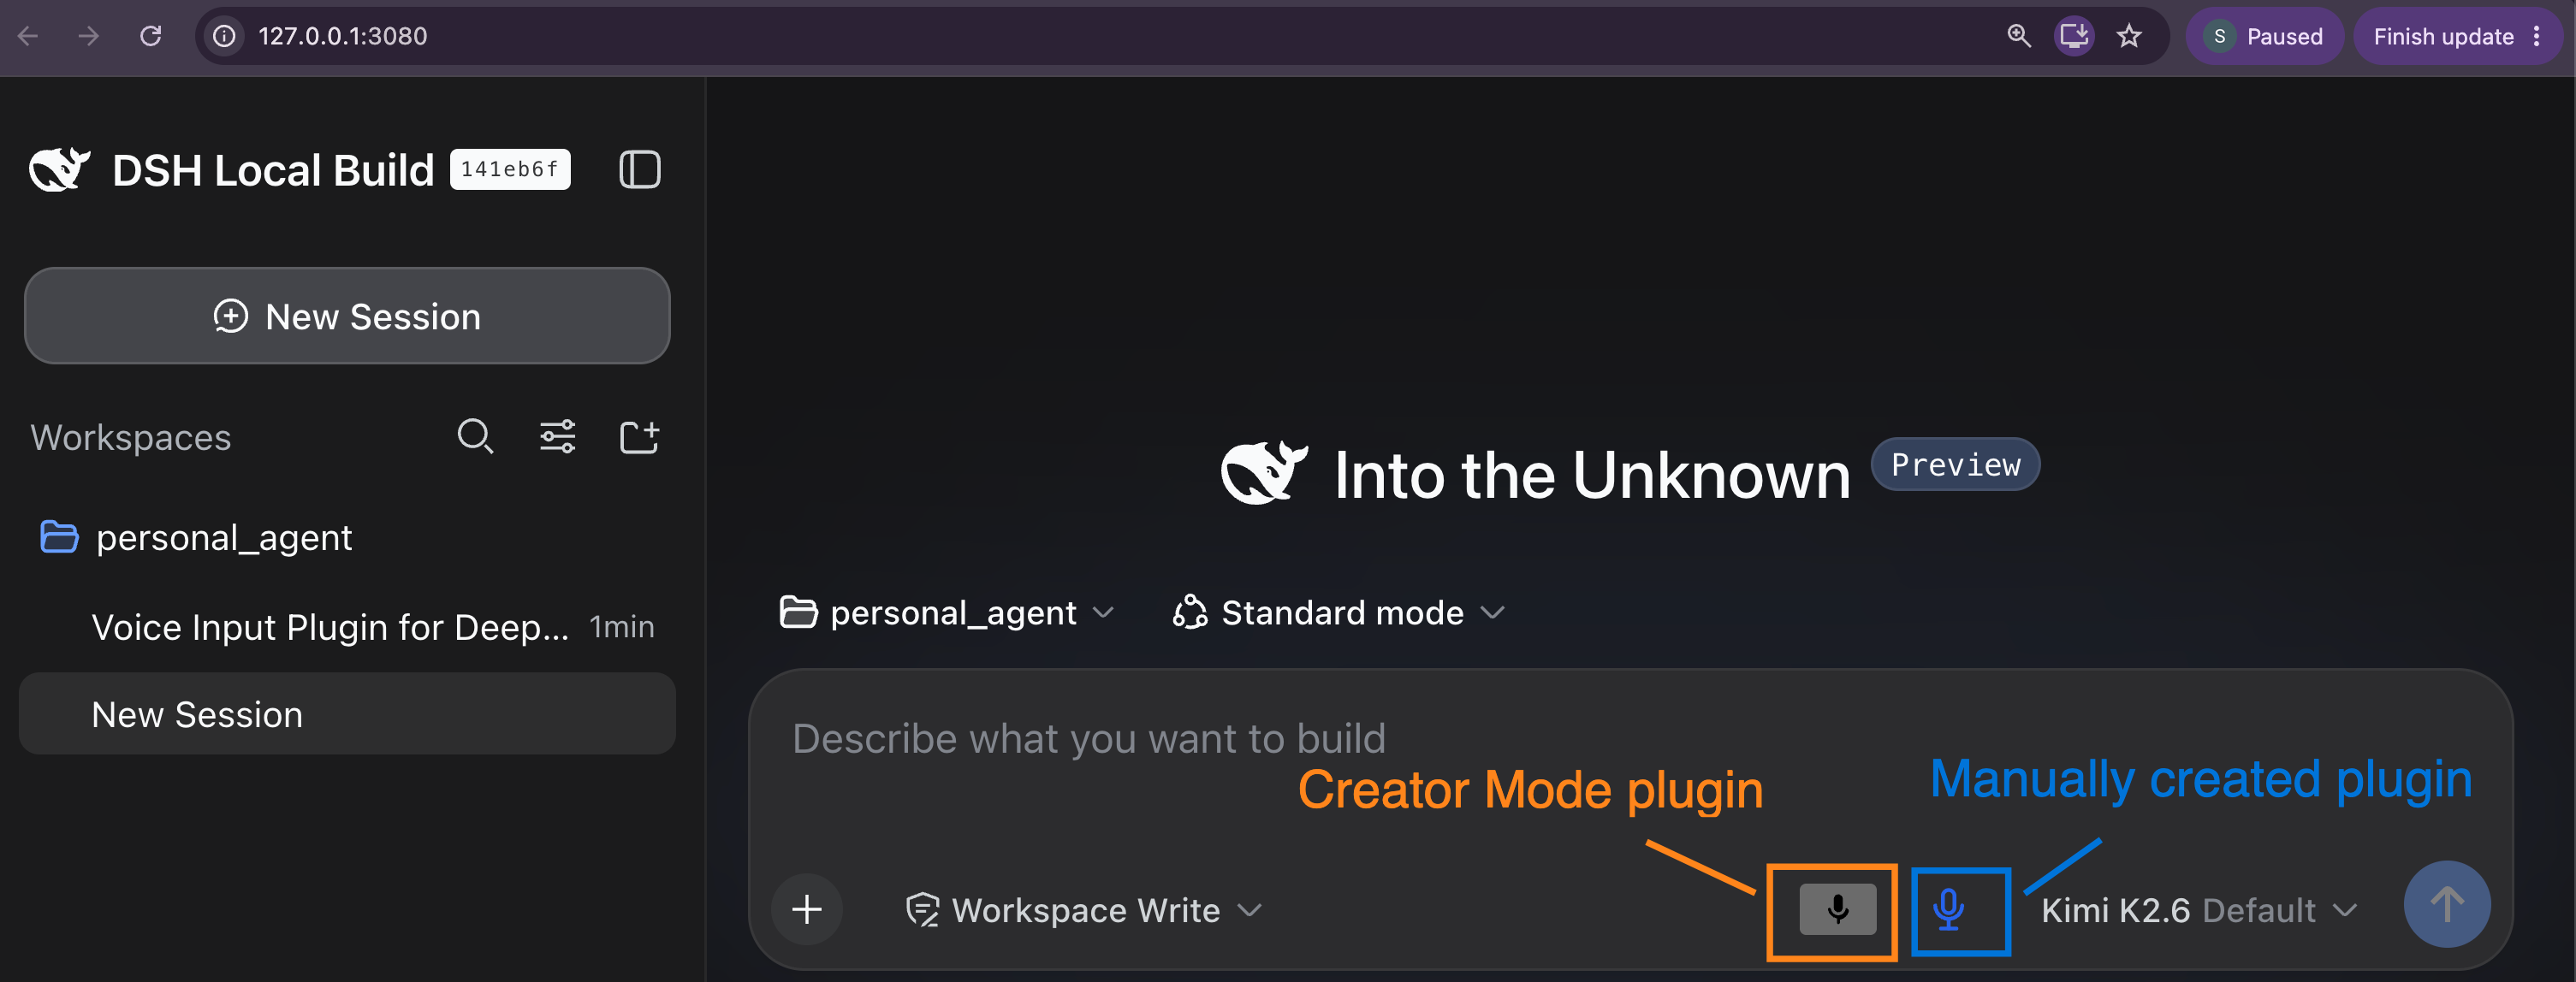
We can enable or disable any plugin from the Cordis configuration by setting disabled: true or false, like below.
- insert:
    - id: manual-voice-input
      name: dsh-manual-voice-input-plugin
      disabled: true
Conclusion:
That is what I explored about DeepSeek Harness.
Voice Mode plugin creation was interesting. We created it using Creator Mode and also tried the manual way.
There will be many more use cases like this.
Let us try to build more plugins and contribute to the community.