
Claude Code: The Complete Guide for Developers
A step-by-step walkthrough to install, configure, and master Anthropic’s CLI-based AI coding agent

A few months ago, Anthropic introduced Claude Code, an AI terminal coding agent to help developers in their workflow.
Initially, adoption was slow. The main reason? Accessing Claude Code required a separate Anthropic API key, which needed to be topped up with credits. In other words, even if you were a Claude Pro or Max subscriber, you still needed to pay extra to use Claude Code.
Many developers stayed away because of this cost issue.
However, Anthropic recently made a significant announcement. Claude Pro/Max users can now access Claude Code as part of their existing Pro ($20) or Max Plan ($100), with some usage limits. This update made Claude Code available to all paid Claude users.
With this change, more developers have started to use Claude Code. However, many people are still unsure about how to get started or how to make the most of its features.
So, I write this post to cover everything about Claude Code. The first part of this blog covers Claude Code setup and key features like slash commands, hooks, and MCP server integration. The second part includes useful GitHub repos for Claude Code, developer workflows, and pro tips, all in one place.
We'll cover:
Part 1: Claude Code Basics
Installation and first run
Custom slash commands
Claude Code Hooks
Claude Code Memory
MCP integration, and IDE setup
Part 2: Claude Code Collections and Developer Workflows
Collections of Custom slash commands
Collections of Claude Code Hooks
Collections of claude.md files
Collections of Essential MCP servers
Build GitHub Actions workflow with Claude Code
Work on Multiple Features with Git Worktrees in Claude Code
Automate Your Development Workflow with Claude Code
Calculate Your Claude Code Usage
How to justify the $100 Max plan
Ten Pro Tips for Claude Code
Let us get started!
Part 1: Claude Code Basics
Claude Code is a terminal-based coding agent from Anthropic. It's now the latest alternative to Cursor. Since it runs in the terminal, you can use it with any IDE or your existing workflow.

1.1 Installation and First Run
Setting up Claude Code is straightforward. Ensure you have Node.js 18 or newer and a supported operating system such as macOS, Linux, or Windows with WSL.
Install Claude Code with npm:
npm install -g @anthropic-ai/claude-code
cd your-project-directory
claude
Do NOT use
"sudo npm install -g"as this can lead to permission issues.
Authenticate with your Anthropic account on first run. Make sure you have a Pro or Max subscription to access it without extra API costs.
1.2 Slash Commands
Claude Code comes with built-in slash commands. It makes working with Claude Code much easier. Explore commands by typing /help or just start typing / to see the full list.
Custom slash command
Claude Code lets you create custom slash commands. These are basically shortcuts for prompts you use often. Instead of typing the same prompts over and over, you create a command and reuse it.
There are two types of custom commands you can create,
Personal Commands (will be available across all your projects)
Project Commands (specific to a single project)
Creating Personal (user) Command:
a. Create a markdown file and place your file in ~/.claude/commands/.
cd /home/user-name
mkdir -p .claude/commands
vi cleanup.md
b. Write all your prompt instruction in that markdown file. Use $ARGUMENTS for dynamic variables.
#cleanup.md

Analyze $ARGUMENTS and identify dead code:
- Unused functions and methods
- Unreachable code paths
- Unused imports and dependencies
- Commented-out code blocks
- Obsolete configuration files

Provide a cleanup plan with safe removal suggestions and potential impact analysis.
c. Save the markdown. Now use /cleanup in Claude Code to run your instruction.


Usage examples:
"/cleanup src/components" to clean a directory, "/cleanup UserService.js" to clean a file, and "/cleanup authentication" to clean a specific feature.
I tried this on my codebase. Here's how it worked based on the instruction given in the cleanup.md file.
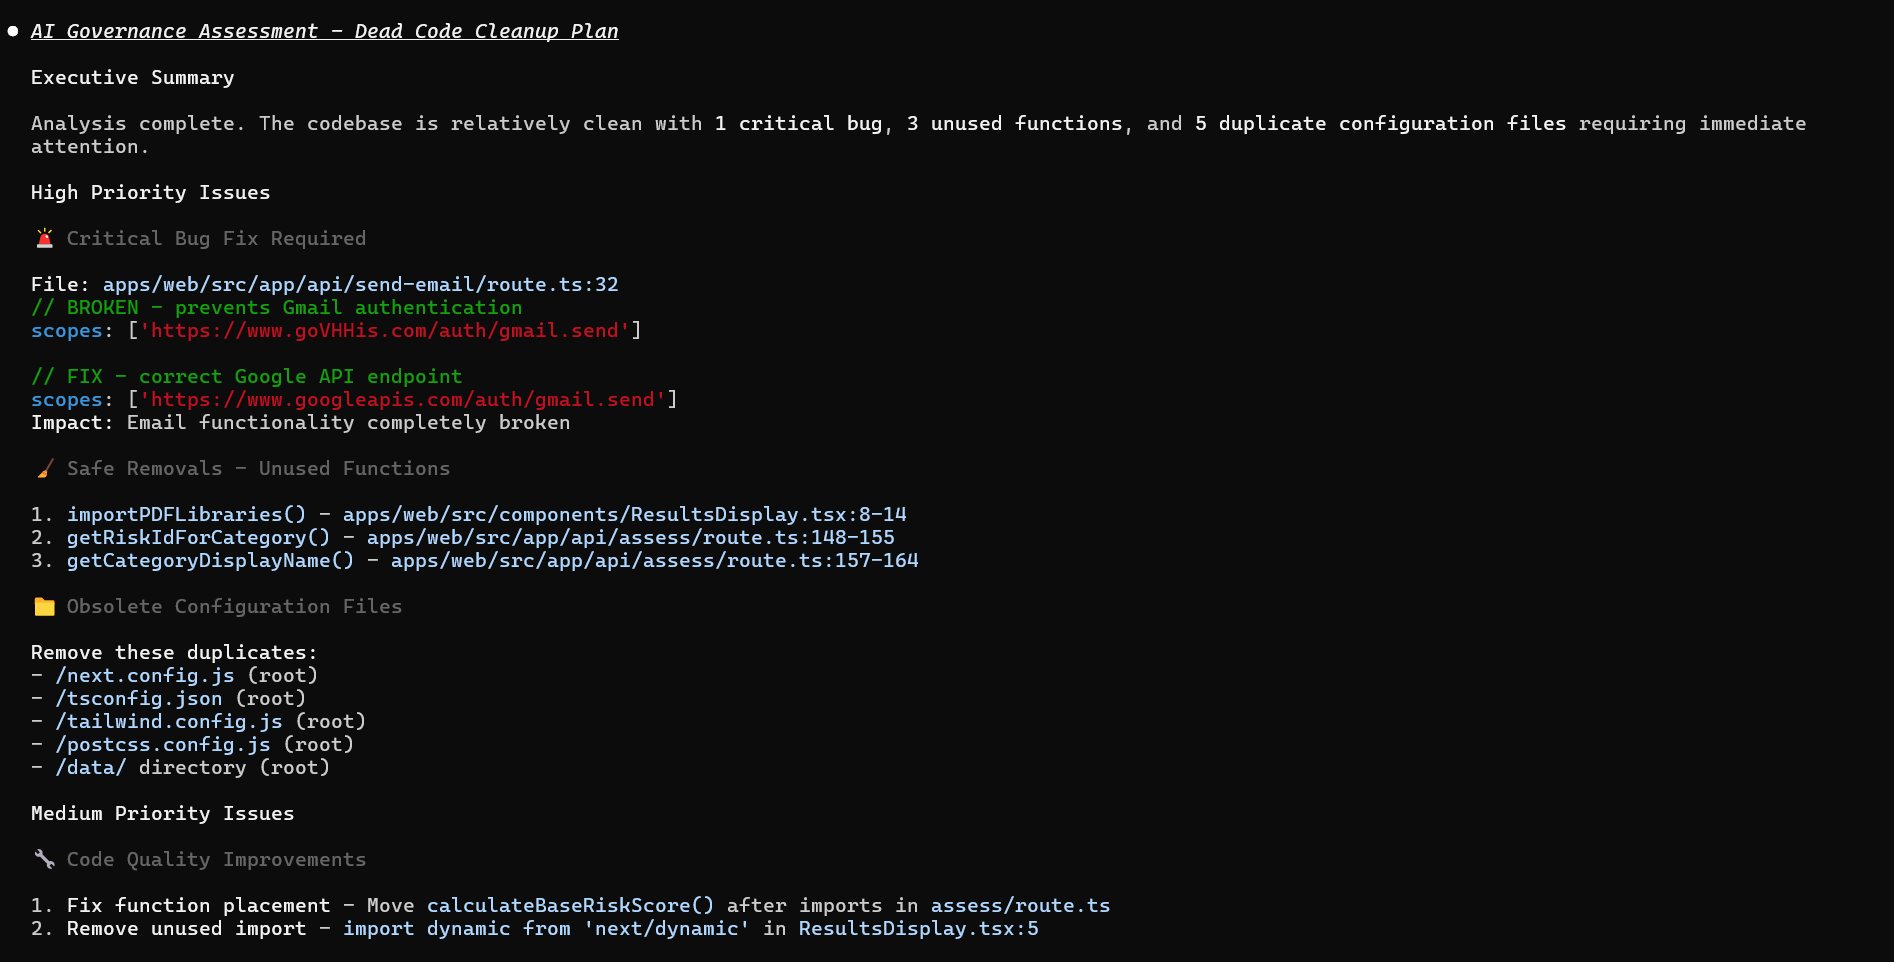
Creating Project Command:
Project commands live in project_dir/.claude/commands/ and are only visible within that project.
a. Create the markdown file inside your project.
cd your-project-directory
mkdir -p .claude/commands
vi security-review.md
b. Add your prompt and save.
#security-review.md

Review this code for security vulnerabilities.
Suggest fixes for any security issues you find.
Highlight any risky dependencies or unsafe patterns in the code.
c. Now you can use /security-review in your project.


Organizing Commands with Folders
You can organize commands in subdirectories for better structure.
project_root/.claude/commands/

├── frontend/
│   └── code-refactor.md
├── backend/
│   └── build-api.md
└── utils/
    └── create-README.md
When organized this way, Claude Code displays folder names with slash commands. It makes easy to find what you need.

Quick Tips
Keep commands simple and focused.
Use
$ARGUMENTSto pass dynamic inputs.
1.3 Claude Code Hooks
Claude Code Hooks are user-defined shell commands that run at specific points in your workflow. Because these hooks execute without confirmation, it’s important to make sure they are safe and secure.
a. Create hooks using /hooks command.

b. Choose when your hook should run (e.g., before a tool runs, after it runs, on notifications, etc.).

c. Once the hook event is selected, Add New Matcher

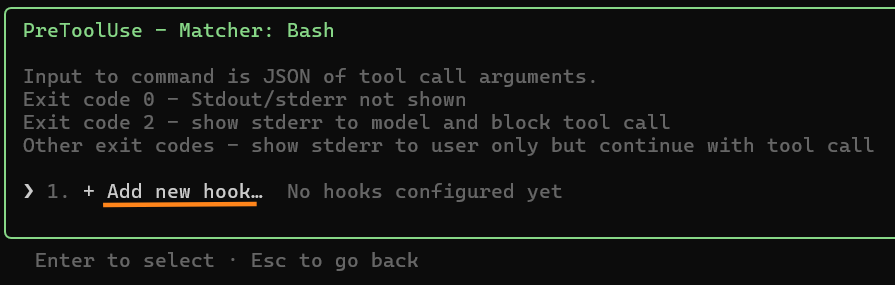
d. Type Bash for the matcher. Find the various matchers for PreToolUse.

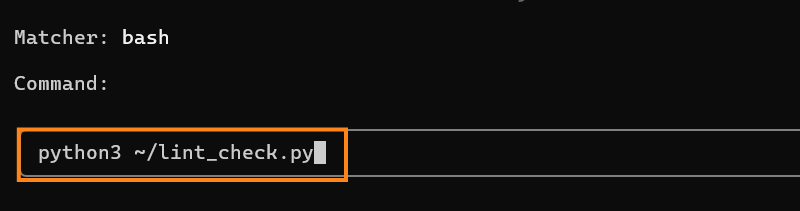
e. Click Add New Hook. and enter the command that needs to be run,
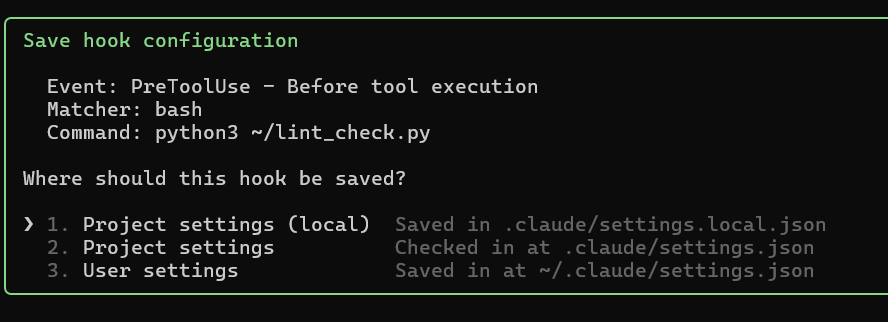
f. Save the hook either at user or project level.
g. Once added you can see your hooks with /hooks list.

We selected PreToolUse as hook event. It means every time Claude Code is about to execute any prompt, your hook script will run first. If your script finds any issues, it can even stop the process right there.
This is a simple example of how effectively we can use hooks.
Hooks settings in Claude Code are saved in settings files. You can set them for yourself or for your whole project.

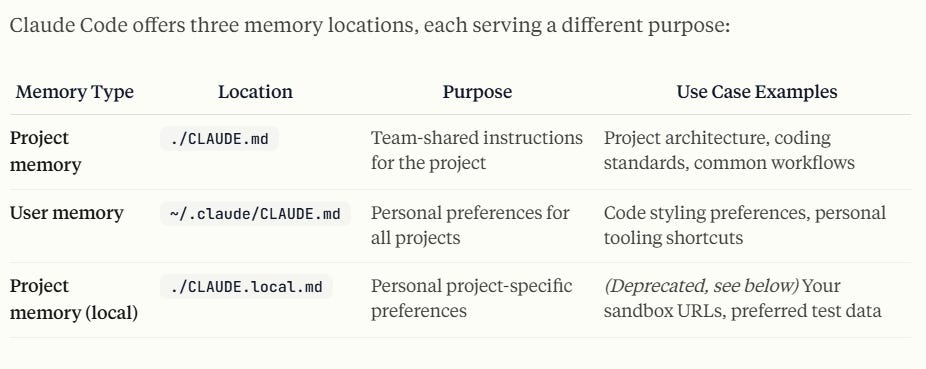
1.4 Claude Code Memory
Claude Code has a memory feature called the CLAUDE.md file. This is the first file it reads with every prompt. Add your project details, coding standards, build steps, or anything else you want Claude to remember, just like Cursor rules.
Memory Types
Claude Code supports three memory types. Each one serves a different purpose.
Command to Create CLAUDE.md
Run /init to bootstrap the file. Choose the memory type and location.


Command to Edit CLAUDE.md
Use /memory to edit


Quickly add memories with the # shortcut
To add memory fast, write your input with the `#` character and enter.

What you can write in CLAUDE.md
CLAUDE.md can contain any information you want Claude Code to remember about your project. It can have project overview, commands, coding standards, folder structure, design notes, links to docs, etc.
Below are some examples
project preferences
See @README for project overview and @package.json for available npm commands for this project.

# Additional Instructions
- git workflow @docs/git-instructions.md
personal preferences
# Individual Preferences
- @~/.claude/my-project-instructions.md
Let us now see how to add MCP Servers in Claude Code.
1.5 MCP Integration and IDE Setup
We can connect Claude Code to different MCP Servers.
Stdio MCP Server (Local or npm/PyPI MCP Server using stdio transport)
SSE MCP Server (Remote MCP server using SSE as transport)
Streamable HTTP MCP Server (Remote MCP server using HTTP streaming)
Adding Stdio MCP Server
# Basic syntax
claude mcp add <name-for-server> -s <scope> <command> [args...] -e <env-variables>
For example, I added the Notion MCP server with user-level scope and custom environment variables.
Use
-sto set the scope (e.g.,useror project)Use
-eto pass environment variables

I also tested it.

Adding SSE MCP Server
I built an SSE-based MCP server long back, so let’s try adding that now.
Add "--transport SSE" Flag for SSE Server

And it works like below.

Note that MCP originally used HTTP + SSE for transport. It now supports the improved HTTP Stream transport but still remains compatible with SSE. If you want to know more about the MCP transport, please check this page.
So let us now try connecting the latest HTTP Stream MCP Server.
Adding Streamable HTTP MCP Server
I built an MCP server that uses HTTP stream transport. This server deploys your web app to Vercel or Render based on your input. I connected it to Claude Code using the --transport http flag.

Explore MCP Servers using /mcp command.


Import MCP Servers from Claude Desktop
If you have MCP servers configured in Claude Desktop, you can import them into Claude Code with a single command.
claude mcp add-from-claude-desktop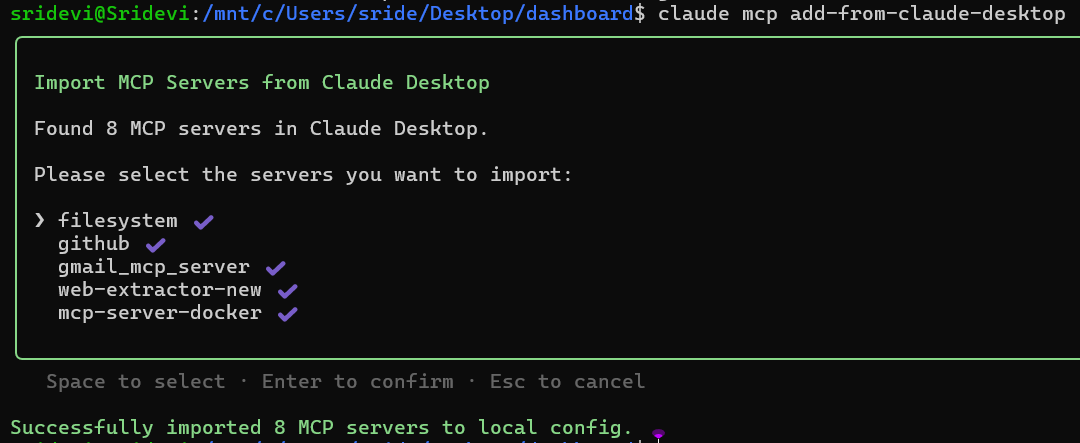
Add MCP servers from JSON configuration
You can also add MCP Servers from JSON configuration.
claude mcp add-json <name> '<json>'
Use MCP prompts as slash commands
If you’ve worked with MCP servers before, you know they have prompts. Claude Code will automatically detect these prompts from any connected MCP server and show them as slash commands in your console.
By default, Claude Code doesn’t create slash commands for MCP servers. But if you define prompts in your MCP server, those prompts become available as slash commands inside Claude Code.
You can see this in my screenshot below. After I added a prompt to my web extractor MCP server, Claude Code instantly created a new command called /web-extractor:summarize-url. Now, I can use my MCP server directly with a single command.

Prompts are a core concept in MCP, just like tools and resources. Here’s the code I added to my MCP server to register this prompt named "summarize-url".
// Prompt: summarize-url
server.registerPrompt(
  "summarize-url",
  {
    title: "Summarize URL Content",
    description: "Extract content from the given URL and summarize it",
    argsSchema: {
      url: z.string().url().describe("The URL to extract and summarize")
    }
  },
  ({ url }) => ({
    messages: [{
      role: "user",
      content: {
        type: "text",
        text: `Extract content from ${url} and summarize it`
      }
    }]
  })
);
Integrate Claude Code with IDE
You can use Claude Code directly inside your code editor. This makes coding much easier.
Most popular IDEs have Claude Code plugins. Install the plugin for your editor. VS Code, Cursor, Windsurf, and JetBrains IDEs all support it.

Part 2: Claude Code Collections and Developer Workflows
This second part of the blog will share helpful collections and real developer workflows with Claude Code. You’ll find links, examples, and tips you can use right away.
2.1 Collections of Slash Commands
We use custom slash commands to save time and automate tasks. I’ve collected some GitHub repos that give useful custom slash commands.
2.2 Collection of Claude Code Hooks
The claude-code-hooks-mastery repo has hooks for blocking risky commands, logging tool actions, and sending notifications. You can explore the
.claude/hooksfolder to see real examples.This awesome-claude-code repo also collects useful hook examples from the community.
The claude-code-for-power-users repo lists hooks for tasks like code formatting and notifications.
2.3 Collection of claude.md files
Developers use claude.md files to help Claude remember project details, coding standards, and instructions.
This GitHub repo has a collection of claude.md files from different projects.
claude-code-for-power-users explains a comprehensive claude.md structure.
2.4 Available MCP Servers for Claude Code
There are many MCP servers available for Claude Code. Here are some resources with lists of available and essential MCP servers.
2.5 Build GitHub Actions workflow with Claude Code
You can go from idea to working automation by just describing what you need.
Watch a demo video here.
In this demo, the user asks Claude Code to create a GitHub Actions workflow that updates the README with a list of .md files. Claude Code breaks the request into steps, generates the required Python script and workflow files, commits the changes, and handles any errors along the way. After setup, every commit automatically updates the README as requested.
2.6 Work on Multiple Features with Git Worktrees
Sometimes you need to work on multiple features at once. But working in the same branch causes conflicts.
Use Git worktrees to create separate copies of your codebase with each copy on its own branch.
This means you can develop different features in parallel.
You can automate the setup with scripts or terminal aliases to create branches and open new IDE windows.
Run a separate Claude Code instance in each worktree with its own terminal and port.
Your work stays isolated, so features don’t clash.
When you finish a feature, just commit your changes and merge them back into the main branch.
This approach is great for anyone who wants to build multiple features at once without waiting.
Watch the complete technical implementation here.
2.7 Automate Development Workflow with Claude Code
Turn on plan mode with Shift+Tab to see the plan before coding starts.
Use
/initto set up your claude.md file with project rules and context.Drag in screenshots of errors or UI designs to give Claude more context.
Add folders from other projects so Claude understands your full app structure.
Share docs or paste URLs so Claude has access to the latest API info.
For big projects, let Claude use sub-agents to work on tasks in parallel.
Always review the code output, just like you would with a pull request.
Create custom slash commands like
/issues [task description]to generate GitHub issues in user story format. The issue gets uploaded to GitHub automatically.Run
/work [issue number]to pull an issue, let Claude work on it, and make commits after every big change.
See how another developer runs this workflow here.
2.8 Calculate Your Claude Code Usage
If you want to track Claude Code usage, try the ccusage tool. It analyzes your Claude Code token usage and costs from local JSONL files.
npm install -g ccusage

ccusage          # Show daily report (default)
ccusage daily    # Daily token usage and costs
ccusage monthly  # Monthly aggregated report
2.9 How to Justify the $100 Max Plan

2.10 Ten Pro Tips for Claude Code
This post from Anthropic discusses some Claude Code best practices. In addition to that, here are some tips I've found useful.
1. Claude Code as a CLI
Claude Code works like any command-line tool. You can use arguments, run it headless, chain commands, and pipe data.

2. Use Claude Code with flags for more features
You can add flags to your commands for extra control. For example, you can set the output format as json using a flag. Here are some useful flags.

3. Plan Mode for Better Results
Press Shift+Tab to activate plan mode. Claude Code creates a detailed plan before writing any code. Review the plan first, then let it execute.

4. Use Sub-Agents for Complex Tasks
For big projects, tell Claude Code to use sub-agents. Multiple Claude instances work in parallel on different parts of your task. This turns hours of work into minutes.
5. Skip Permissions for Claude Code
Use --dangerously-skip-permissions while starting claude to avoid continuous permission prompts.

6. Slash Commands for frequent and common Tasks
Create slash commands for frequent and common tasks like refactoring or code review. They save time and add flexibility.

7. Memory Management - claude.md File
The claude.md file is your project’s memory. You can use it to store instructions, style guides, and any important information you want Claude Code to remember.
When writing instructions, be as clear and specific as possible.
For example: “Use 2-space indentation” is much better than just saying “Format code properly.”
8. Image Feedback and Screenshot Automation
When you’re building a UI, you can give feedback to Claude Code by pasting screenshots. Just drag and drop the image. You can also automate taking screenshots using a Puppeteer or Playwright MCP server. Claude Code is really good at handling UI tasks if you share an image and ask it to make changes.
9. Claude Code as MCP Server and Client
Claude Code works both as an MCP server and a client. You can connect other MCP servers to Claude Code to use their tools. You can also make Claude Code act as an MCP server, so other clients can connect and use what Claude Code offers.
10. Claude Code with GitHub
Claude Code works seamlessly with the GitHub CLI. You can open pull requests, review code, and manage issues from the interface. The GitHub MCP Server is rarely needed, so you can think and add this, if it is really needed.
Conclusion
We have now seen everything about Claude Code. It is time for you to try out the commands and configurations we discussed. Explore them and find the workflow that works best for you.
Since Claude Code is available with both Pro and Max plans, you can use it for all kinds of tasks without any extra cost. It makes development smoother and more efficient.
So go ahead and give Claude Code a try. See how it fits into your daily workflow and helps you get more done.
Happy Learning!